Friday, 16 December 2016
These Zamberlan boots were made to fall apart
I don't know what it is about modern materials, but they ain't like they used to be.
A few months ago, my leather Zamberlan boots fell apart. The sole just fell off, revealing a crumbling inner core. It turns out the sole/core is polyurethane/EVA and the cheaper the boots, the worse the life. Whilst I could get the leather parts removed and a new sole glued on, I've just decided to change brands. Annoyingly, the summer boots I bought in the USA for about €10 over 15 years ago have also failed on the sole. They just sell junk there (in case you are an American reading this, that bit is ironic. Just that bit you understand)
I've gone for a synthetic mountain high boot, 4 hour water proof, semi flexible. Quechua (own) brand for €69. The branded ones wanted twice the money and then more if I wanted the convenience of dry feet. Didn't see any leather boots. Prices went to €180.
Whilst taking off my trainers (well, light hiking shoes) I noticed the heal is coming away from the outer. I really splashed out on the cheapest pair of similar shoes for a staggering €13.
Thursday, 1 December 2016
LS2 FF396 bike helmet visor repair
On the bottom of the lid, there is a control to drop the sun visor down and up. There are 2 bits. A substantial red semi-circle and a crappy little black lever on a T stem about 2mm x 2mm. Put the lid on a shelf (who doesn't) and eventually you catch this little lever and it snaps off. You then can't retract the sun visor without forcing it.

The mechanism is easy to remove - 2 screws on the outside of the lid behind a rubber trim.
In the pic above, you can just see where the lever has sheared off - look for the arrow.
I found a bit of small pvc tubing, heated it up and pushed over the remaining stub. Then I hot glued it and put a cross pin in for good measure.
 The next time it's caught I think that it will destroy the rest of the flimsy mechanism.
It's a real shame on otherwise a very comfy lid. I bought this April 2016. I notice 7 months later the control for the sun visor is up by your ear.

The mechanism is easy to remove - 2 screws on the outside of the lid behind a rubber trim.
In the pic above, you can just see where the lever has sheared off - look for the arrow.
I found a bit of small pvc tubing, heated it up and pushed over the remaining stub. Then I hot glued it and put a cross pin in for good measure.

It's a real shame on otherwise a very comfy lid. I bought this April 2016. I notice 7 months later the control for the sun visor is up by your ear.
Friday, 18 November 2016
Waitrose email 'service'
I'm really not sure how to start this rant. Waitrose and John Lewis sell the idea that they are a bit better than everyone else. And I'd say that was the case until today.
When you sign up with Waitrose broadband, you get an email address. Having had this a few years, the spam level received was getting to around 10 / day. I checked on the web app and found the spam filter was off. Turning it on made no difference. There were rules to set up so I set up the handful of spammer's email addresses to divert to the bin, but that didn't work either.
I contacted support and after a few days they told me it was working fine as there was spam in the junk folder. Spam I'd put there. So back to support and 2 replies and 1 week later I was told to use the John Lewis web app. So I did this and got server errors returned when reporting spam, and the spam kept coming.
So I contacted support and they finally told me that the Waitrose mail server is very old and doesn't work for spam and filtering and the John Lewis web app doesn't work for Waitrose customers.
So, to summarise, about 5 hours work over the 2 weeks it took them to reply finally made them admit that they have no spam filter. Why they couldn't just tell me this on day 1 is totally beyond me.
Their best suggestion was to get a third party email. I think I'll just get a new ISP.
Waitrose Wasters.
Thursday, 27 October 2016
Thursday, 8 September 2016
Stone pile
33 barrow loads of stones (1.5t ?) taken from the old log store area (now a planting area) up near to the new wood store area on the north boundary
Saturday, 20 August 2016
No 2 rcd trip
During the last thunder storms rcd no2 has tripped. I'd put this down to ground potential differences as 2 outdoor sockets are on this rcd. Another outdoor socket, slightly further away on an adjacent rcd was ok. Last trip, I'd noticed the rcd a bit reluctant to reset, and put this down to water in the outside circuits.
Today, no 2 reset ok; it has been very dry in the last few week, but was pissing down during the storm. As I happened to have a spare AC type, I've swapped out the 2009 nalto 40A/30mA type AC (only 3kva!) for a 2005 10kva 80A merlin gerin.
The fridge/freezer had been on no 2. I've moved it to a spare dedicated circuit on another rcd, which was for the oven. There is also another spare 32A circuit for the cooker if needed.
Also did routine maintenance on the board, rcd trips & screw tightness.
Saturday, 23 July 2016
Wood
Well, not wood but logs.
The end of winter 2015-16 saw about 0.75 stere of logs in the store.
6 trailer loads of logs (about 2 hours per load ~0.5st - cutting trees into 25cm lengths, splitting, moving trailer to store, stacking in store) have now been stacked, adding about 2.75 stere
24/8 added another 2 trailer loads. Store up to 4.5 st.
Monday, 18 July 2016
Menabo roof bars
A set of aluminium roof bars for €86 delivered, or about 1/2 of what Thule want. My existing Thule 750 feet will not in any way work with the new fitting kit (confirmed by Thule and a few posts on-line) which requires a 754. A 754 is over €100, plus the fitting kit at around €40. The existing bars are possibly ok, but a tad short. Thule refused to tell me if I could modify the 750 to make them work, so I took this as a yes, but it's a (financial) risk. Thule told me there was no way except to use a 754. They lost their sense of humour when I pointed out that they had competitors and that I can buy and throw the Menabo bars away and still have enough cash left over to buy another set. Perhaps there's no price comparison internet in Sweden.
So Menabo bars it is. They're ok. For reasons best known the them (well, it's cheaper) the bars don't use the threaded holes for the bars under the gutters. Still, they fit just fine and are nice and light. Like Thule, they use an annoying allen key to tighten it all down.
A nice touch on the rails is a channel you can drop fixings into, so the ski rack can just slide on.
Wednesday, 13 July 2016
Dewalt DC981 Rohm chuck
Securing screw for chuck is Torx t20 LH. Measures 6.2mm on thread, 5.7 on shank. Not a set screw.hex head - it had a rounded rather than flat bottom to the head.
Found a Dewalt service sheet that implies it's always a bit stiff, as there is a special fixture, which involved removing part of the drill initially. IIRC Tighten screw to 9Nm and chuck to 45Nm.
A bit reluctant, but a soak in lubricating oil over night loosened it up. Put back without thread lock.
Didn't remove chuck. Cleaned up the jaws, and oiled as much as possible. One stiff point around 8mm went away. Hopefully this will cure the slippage.
Looked and didn't find any videos, but it looks like the way into the chuck is to hold the area just below the knurled part (probably need to remove chuck) and unscrew normally. Watch out for falling ball bearings!
Wednesday, 6 July 2016
Friday, 1 July 2016
Stihl strimmer head
Bought head 46-2 from Soulé €38.80. Came with 5m of 2.7 red line. Line seems to have a groove running down it.
Supplementary gate remote microcontroller stopped working
A few more failures in 2017. 9/12/17 added a watchdog.
Saturday, 28 May 2016
Oregon tap & go 539137
My Stihl strimmer has a fixed feed line, which is ok except when you're working a lot of edging. Then it's tiring stopping to unscrew the bolt and let some more line out.
I've had a number of Oregon products and found them good. Mainly safety gear, but the odd chain.
I found the tap & go product which is suitable 'for most' strimmers above 33cc. So I bought one. Nice product. To re-fill it, you simply feed it through the holes and turn the dail to load the line in. Great.
The on-line instructions and video make it clear that it will only work with 20mm spigot, which I have. So I open it up and lo, its a 25mm hole with a reducing ring. Sigh. So I fit it and it is so off centre, the whole strimmer vibrates violently; it is painful to hold the controls. I take it all apart and try to re-centre it. The reducing ring is about 0.4mm different diameter to the hole in the product, so no matter how carefully you install it, it will always be off. The ring is also thicker than the product, so if you have a flat washer with your strimmer (as shown in the video), it won't hold the base in place and it'll wobble.
I've asked Oregon to send me a replacement.
Oregon wanted very much to help, but this involved me travelling 2 hours to my nearest dealer. In the end I got a full refund of Amazon, who didn't want it returned.
So with nothing to lose, I made an accurate 20mm hole in a large washer, which I tacked into position with a run-out of 0.3mm. It was a bit better. A friend suggested balancing the head on a marble and adding weights to get it level. Pretty tricky (read impossible) but I think I found the balance point, so added 2 M5 bolts with blu-tack. There wasn't really enough space to fit them, but it was a test. They flew straight off. I noted the the large alu button that comes with the head is held on with 2 bolts, which don't appear to be balanced up.
Abandoned project! Off to get a Stihl 46-2
Friday, 27 May 2016
Dewalt battery
New dewalt pack made from irobot cleaner pack for 510/530 series.
Downtown direct. 3Ah. No manf date or cell make. £3 amazon.
The box it came in, and almost fitted, states the cells are samsung or sony. It also states this is a li-on pack, so little confidence there.
Cells are stamped cbt-sc30mk18 c03
22 x 43mm
First test with a 1.1A load gave a running time of about 2.5 hours (~2.7Ah), so the cells were pretty well charged.
Bought another irobot battery pack in July 2016. This time a BAKTH 14.4V 4000mAh Replacement NiMH Battery for iRobot Roomba 400 series Vacuum Cleaner at £6.70. No manf date. A bit of charge left.
They are no-name cells inside. Poor spot welding. This replaces the 2Ah AEG pack, which I'm moving to the Wickes drill, which replaces a bunch of AA cells which just don't have the umph.
From fully charged, a constant 1A load was applied and got forgotten about until the battery was down to around 1V. A very gentle recharge was applied for 10 + hours, but whilst the volts rose steadily to 15V set point, the charge current stayed 0.4A (C/10) and even when the volts were reduced to 14.4, current dropped off, then stayed at 0.4A.
A discharge with the dewalt lamp (9V cut off, 0.7A load) gave around 4.5 hours, or 3.15Ah. Not very impressive. Currently on the normal charger; takes about 2h and gets pretty hot.
Thursday, 26 May 2016
Reversing camera
After looking at all the various options for a reversing camera, Amazon had a monitor and small reversing camera for a tiny £7. Not expecting a huge amount, I ordered it.
Really quite good. The camera is small and mirrors the image correctly. It even puts coloured lines on, but they aren't that useful, even though they've had a go at parallax correction; the start of the red zone varies from 30cm on the ground to around 10cm at the bumper.
Installation was interesting with the cable provided with the camera. A combined power and video with a phono. The power cable has a smaller 2.1mm barrel plug. The umbilical from boot to car is a bit tight, but a bit of water based conduit lubricant sorted that. Then snaking it through the car is fairly straight forward. I was a bit time constrained, so the monitor is loose in a change tray, and the lot is powered off a cigar plug. The camera is about 20mm diametre. It is readily obvious sticking down about 20mm from the trim above the number plate. It doesn't protrude at all. I could have hacked the plastic panel that it sits on, next to the plate lights, but it would still be visible by about 10mm.
Works well and I can just see the tow ball and the bumper about a metre either side at the closest, and about 3-4m away up to 1.2m high.
Another hour or so spent trying to find the reversing light wiring. The lamp is set into the bumper on the right side. You can't replace the lamp or get the fitting out without removing the bumper. Thanks Renault. You didn't learn from all the negative feedback received when you so 'cleverly' required the removal of the front wheel on the Laguna? to change the headlight. The wiring (pink + black at the light), it turns out, snakes inside the bumper, picking up the reversing sensors and the fog light, then comes inside on the left side. From the installation manual for the tow bar, it looks like the fog light and stop light are hard wired from the front. The reversing lamp is too. The connector is just by the rear left passenger door - remove the trim that starts in the boot - 4 screws. If you already had a main dealer install the tow bar, then expect all the clips that hold the panel to the car to be broken too. Thanks Renault. €400 well spent for a waster in a grey boiler suit who can't be arsed to go to the stores and get a handful of clips. Well, it's not written in the instructions. I note the instructions are pictures with no words, so that might explain it.
The cable from the camera was split out and + & - wired up. The -ve to a handy chassis bolt and the positive to the reversing wire - purple/white (not pink, thanks Reno) I think, pushed into the connector and tyrapped it. A 800mA fuse protects it. I might put in a delay timer to keep the camera on for a few seconds after coming out of reverse, as there is a 1.5mm permanent power feed there too protected by a 20A fuse if the tow bar instructions are correct - feed for the trailer canbus unit (1/4" faston). Reverse signal was not available there, despite there being 5 unused terminals!
The voltage on the rev light was 11.5 during normal use (battery about 12.5v) After splicing int he camera (about 0.3A) it dropped to 11.35v. The cable to the monitor is very thin and it was about 10.9 there. The pair operate ok down to 9V and below, but there is a bit of line break creeping in then.

The delay timer I added. Simple RC circuit, transistor and relay
Tuesday, 24 May 2016
Wednesday, 11 May 2016
MT-09 auxilliary power connector
Those nice people at Yamaha live in the real world. They know you're going to hack in a supply for your GPS or mobile, so they've already installed a fused (2A) connector and put it under the RH fake air intake. Just pop the centre out of the 2 plastic clips, accessed from the fork side, then the single hex bolt. Ignore the 2 hex bolts holding the grill mesh in place.
The connector is supplied with mating half, but no pins. These are readily available from the USA, which to order 2 costs around £15 delivered. I couldn't find anything on the Yamaha site; they sell the normal hack adaptor with spade connectors to go direct onto the battery.
So, time to hack something together.

The pins started life as a cheap automotive pin crimp. Ampliversal ones are too well built to use. Remove the red cover, squash the hole a bit so that it fits the aperture in the mating half, the file a notch, and cut it to length. I did it at about 7mm, but try 9mm. Solder some wires on and push it in until it clicks. You're supposed to have waterproof ferrules too, but just push the original ones back in. Then mate.
You can get waterproof connectors on ebay, but I just used a standard 2.1mm barrel connector which I tuck back under the air intake. It's what I had on the old bike for 11 years and it never got wet or rusted. I've got a flying lead from the tank bag to a small 12/5V adapter. It's about 80% efficient, meaning the 12V x 2A = 24W from the bike can supply 24W / 5V * 0.8 = 3.8A@5V plenty for even the thirstiest products.
I then made the USB adapter.
I forgot to take pictures as I went, but the shot below gives you an idea

The pcb is a generic switching regulator, normally around 5 for £1 delivered. Takes up to 28V in and delivers up to 28V ish out.
I set it for 5.25V, as most branded USB adapters I've tried give out around this, or a bit higher. I had a spare USB socket, which I soldered to the PCB by flattening out the through hole tabs. Short the middle pins together to make it simulate a DCP (dedicated charging port - see https://www.maximintegrated.com/en/app-notes/index.mvp/id/4803 for a factual description of how to make your USB appliances draw more than 0.5A, or see pretty much any hobby site for rants abouts Apple's 'secret' wiring etc, etc) I did note in testing that my Samsung tablet would only take 1.2 - 1.4A with shorted pins, but would go to 1.51A with 300 + 100k resistors wired +5/0V to the shorted pins. It was fairly unscientific and for all I know it just needed less current at some times when it was charging. The official charger showed 1.8A. Life was too short to get too technical. All I want is a charger for the phone or GPS etc on the bike if I'm caught short.
The picture is taken during a soak test at around an amp. I say 'around' as the little meter thingy is about 10% accurate on amps, and 5% on volts.
A SMD LED next to the socket gives you power on indication with the plug removed. A piece of heat shrink finished it off. I didnt fit a fuse as the bike has a 2A.
Through the heat shrink, it feels like the chip is running at about 60C, which is pretty good considering there is no airflow. The chip, a MP1584, has a maximum dissipation of 2.5W, which IIRC gives a practical limit of around 5V/1.0A before the chip shuts down as the die hits 150C, assuming 14V in, 85% efficiency
5W out, 5.9W in = 14V@0.42A. Vd = 14-5 = 9V x .42 = 3.8W dissipated. Oops. Working that back for 2.5W gives 5V@0.66A
Perhaps I should have left the D+/D- floating to limit the draw to 0.5A
A soak test for an hour at 1A has been OK, so I guess the heat shrink is radiating a bit, plus the USB plug will be an external heatsink.
Saturday, 16 April 2016
Cut the hedge
The hedge that runs across the back of the house is about 40m. It used to be kept in shape by the cows that lived here before us. I've always cut it back every spring. When we planted the fruit trees we measured the planting holes from the hedge. It was last year that I realised that something was up. The NW boundary had grown and got hacked back a good way. Now it was the turn of this hedge. Removed around 1m in the NW corner and around 1.8m in the NE corner. More cut and scratches than I care to mention.
Wednesday, 13 April 2016
Salomon ski boot custom liners
Used a SMD heat gun 20mm nozzle, 110C, fan 7 (almost max) Measured temperature as 110C at 3cm.
Only wanted to expand shin area, so heated this at 3cm for about 10 mins. I reckoned that full expansion was locally achieved in a few minutes. Measured an increase from 17mm at cuff to 20mm, although after re-fitting and cooling this was down to 18mm, but felt very snug.
From a number of posts, cooking temperature for liner (no footbeds) is 90-110C for 10-15 mins, convection or fan oven.
Refit footbeds and fit into shells. Jump in, buckle up on a medium setting and don't move for 10-15 mins.
Thursday, 7 April 2016
Digital tyre pressure gauge
In a fit of spending, I bought a digital tyre pressure gauge. Now I have accuracy, I have dilemma.

This gauge reads 2.35bar, old faithful reads 2.6, tyre inflator reads 2.5bar.
It's a small error - say 10% between them all.
Out of a desire to not break something and leave it alone, I opened up the gauge. It's got markings that suggest you could display more than just bar/psi. It's a Shineway pcb and uses a cr2032 battery. No ID on the pressure sensor itself.
It has a tempting box marked R9. Putting a 1k resistor on there reduced the pressure reading from 2.3b to 1.3b. Whether this was a fixed offset of a linear change throughout the range (ie slope) will have to wait until a fit of enthusiasm to play. Or until I stand on it and it breaks.
For now I'm going to assume it reads under by about 0.5b (or round up the result)
The car was serviced about a month ago. The rear tyre should be 2.1 and it reads 2.1 on the digital and 2.4 on the silver old faithful. Front should be 2.3 and read 2.25, old faithful was 2.7. The original battery, a 2032 was not enough at 2.8V to make it work. A 2025 fits ok.
Tyre inflator & power supply
For a good number of years I have been nursing a £3 12V tyre inflater. It wasn't particularly good when new, but was much better than a foot pump. I've variously replaced the piston, gauge, pipe and tyre attachment. Then the entire pump when I 'found' one without a case.
I must have blown a seal as it now takes 10 minutes to add 0.5 bar.
So I bought a new one. There seems to be a few basic designs re-labelled. I found a nice-on-paper Black and Decker one, seemingly a one-off. Mains and 12V. Around €50. The reviews were awful, particularly in America. The main fault was that if it worked at all on mains on receipt, it failed pretty soon afterwards. Whilst I'm not adverse to a bit of power supply repair, it was occurring too often. The next one on the list was an AEG KD 7.0 with a digital display and auto shut-off, which was being sold for €44 on French Amazon. German amazon had 6 'good' condition ones for €12.
So I bought that. The main review complaint was noise. I also bought a rubber boot mat (who'd have thought a Audi A4 2003 boot is the same width (and twice as long) as a Captur, which worked out €15 cheaper than the Captur specific one, with the advantage I can use the extra length to protect the bumper.
The pump swallows power. At least 10A to start and 9A to run. I could have taped 2 5A/12V bricks together, but I had an old AT PC power supply. This is plated at 9A/12V. It delivered 11.2 V. Loading the 5V rail with a 6.8R resistor got this up to 12.1V (A 4.7R got it to 12.2, a 2R to 13.5V, but the resistors were getting large and dissipating a lot of power ~13W) Snipped off all the old connectors, put on a big cigar socket. Works well, and it's in a nice steel case.
The inflater is a tad noisy, but will add 0.5 bar in 30s. The one thing I don't like, which seems common on a lot on inflaters, is the tyre connector is screw on, rather than clip on. I could replace it, but it isn't too bad, and at least it doesn't pop off. The original cardboard carton was battered (now in a skip) but other than that it was sealed in a plastic bag and was clean. Amazon used wins again.
I do have another problem, though. If the inflater reads 2.5b, the 'old faithful' stick gauge reads 2.6b and the new digital gauge reads 2.35b. On average, the inflater is correct....
Tuesday, 29 March 2016
Pond liner
The pond liner has shifted a bit, probably when it got pushed out with rising ground water in a storm. It's not the normal butyl, but looks like a black version of the cheap tarpaulins. This material, though, is very strong and difficult to cut, let alone tear. It is largely covered all over, but the exposed bits remain strong.
I needed to increase the height on one side, and it had become the low point. Using bathroom silicon sealant, I applied 2 stripes to the back of it, and stuck a new piece on. Then once that had gone off, I put a small strip on the front, again with 2 strips of silicon. The silicon doesn't stick and peals easily. I left that to cure and left it in that position. It has a log to cover the edge and protect it from the sun (south facing edge)
The liner was not nice and flat and had a few U shapes in it. The job was fine on the large flat areas, but a bit variable around the curved bits. A few weeks on and it is water tight enough not to notice the level drop.
Monday, 21 March 2016
Shiny
Shiny. 9km delivered.

medianav 5.2.8 (April 2016 - latest version 6.0.3)
LG SW LAN5200WR1 5201 5210 open source.
LG SW LAN5200WR1 5201 5210 open source.
Wednesday, 9 March 2016
New trailer
Neptun gn102/n7-202. Advertised at 117kg & confirmed on scales
Stored on end in the garage.
The accessories add around 16kg (15.2kg)
3 clamps (0.7kg),
jockey wheel (4.6kg)
2 props (1.9kg ea)
chocs (0.23kg ea)
lash points (40g ea)
winch 3.3kg + bracket 0.7kg
The additional side panels are 25kg
Stored on end. The joists are at 2.8m

Hoist, strop & shackle. The strop is around 25mm angle iron. The hoist has no brake on unwind. The trick is to lower the A frame, lock the hoist, the move the trailer body to meet the a frame. Lock the body to the A frame and then lower again.
The hoist is mounted onto the A frame using an Armco right angle bracket.

A close up of the locator. The trailer comes with plastic coated steel lugs which forces the trailer COG slightly back when it's on its end. A piece of 25mm angle with a welded stop forms a useful locator. A similar arrangement on the other side.
The lugs are largely useless as they slide on a concrete floor. Fine on gravel, or a rough, ridged concrete slab.

Wednesday, 2 March 2016
Mice, rats and other vermin
We've had unwelcome visitors since the end of December. At first we had the romantic idea that it might be a squirrel sized creature we get in these parts, a stone marten or la fouine, but a web cam showed that a rat was indeed enjoying the warmth that a real fire and lots of insulation can provide. As the loft has 350mm of insulation, the rodents can run around under this lot without being seen. Apple was the best bait.
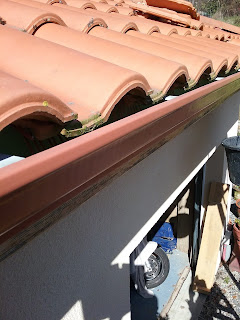
However, the quandary was how the rats were getting in. I blocked a few holes in roof vents, but quickly realised that they were getting in through the enormous gap created by every single roof tile where it meets the gutters. So around 320 doors over a distance of 65m. The next problem to solve was how they were getting there. As all our drain pipes connect together and run the 70m to the road, there was a chance they were like err a rat up a drain pipe? I'd already fitted grills to a lot of the down pipes to stop leaves, so a few more went in. The only other route is along the pergola. The rose has been growing and had reached to roof this year. As we can't stop rodents scaling the plants, we were going to have to block the holes created by the roof tiles.
 Foam was the first idea, but most foam breaks down under UV exposure, and there is little space to get purchase with the foam. The solution in the catalogue of tile supplier looks like a comb in 1m lengths. Being (presumably) made of gold and platinum, this was not a cheap option. Google turned up some copies which were ordered for around €60. As you have to remove the last row of tiles to install it, this was not the quickest of jobs, but 5 hours saw around 1/3 of the house done. The bulk of the time is spent on the corners as the hip tiles can't be removed without starting at the ridge. The next time consuming job is moving the working platform around.
There was no evidence of rodents until the corner adjacent to the rose and pergola. Being small, the mice had a nice path on the wall plate. The rats strolled in over the covered terrasse.
Going further along the south side, I noticed a fair amount of mouse droppings. 5 hours toil saw the last of the house protected and the first few metres of the 2 gullies had grilles fitted with the remaining 10m (of 70m)
If possible slide the tiles towards the ridge avoiding the combs then into place; this stops the combs jamming the correct seating of the tile. A wooden chock holding the tile above out of the way helps.

To date we've caught 3 rats which went, in their mobile 'home', to stay with their friends in the forest a few km away. Having caught all the rats we'd seen on the webcam, there was still noise from the loft. This turned out to be mice. The interweb has may reports of rats being hunters of mice, so whether we had mice to begin with, which the rats followed, or the mice moved in just after the rats is anyone's guess. 3 mice were caught very easily, but the scratching continues, but nothing on the camera. At this point the main entry point is blocked, but the rodents could still run around the gutters to find another door. Rain is preventing further work.
Having moved the camera to the area of scratching, we have another mouse. A lazy, or possibly well fed with a good stash. It runs over the trap which I've put adjacent to the scratching and it shows a little interest.
update. This mouse, no 4 is now caught and released. No 5 is very camera shy. Today's cocktail for its delectation is Camembert (what else, it's French) cashew nut, cat biscuit and the firm favourite of apple.
15/3. A further update! The mouse was a rat, but it ignored the trap, baited with prune. I found that one blocked hole in the gable was re-opened, so blocked it with steel mesh. That night there was a noise from the garage. I opened the door the next day. The rat has not been heard or seen since. Hopefully that is now it. All traps and camera removed.
21/3 Heard nibbling again, and a look outside showed 4 fingers missing off a comb. I shoved some metal mesh in that hole (the most inaccessible in the entire roof) and set the rat trap with apple just adjacent. Within a day we'd caught one, but no more nibbled combs.
Looked like a young female. Have re-set the trap and we'll see.
Below is a shot of one of the rats inspecting one of the home made traps. As an idea of scale the hole it's in is 76mm diameter. All the rats were about the same size - say a body of 200mm and a similar length tale.
The trap on the right was the only success and was a hole with a wire taper reducing the diameter in a cardboard box. The photographed rat decided the best way to get the bait (apple & cat biscuits) was to chew its way in. Twice. Got a steel trap after that.
The next trap to the left is a see-saw, but it's too small. Didn't know how big these guys were...
The trap on the left was a electric remote release. Rats are very inquisitive, but not a single rat entered.

October 2022 and the rats are back. Very enthusiastic this time. So noisy I thought it was probably a dormouse. It turned that they were rats and the noise was the breaking open of snail shells. We have a fair number of snails up against the house and the rats have been taking them to a warm place to eat. The little shits have found unblocked holes around the ridge where it meets the gutter. Blocking these holes and setting a trap got us a mouse and 4 rats. However, the last one, 3 months on, has worked out it can chew its way in and out. The combs are plastic and down the west face there are now more holes than comb. Even if I didn't block the new holes, it cut a new one. I found one supplier of aluminium combs in Belgium, but I reckon a rat could nip these off.

However, the quandary was how the rats were getting in. I blocked a few holes in roof vents, but quickly realised that they were getting in through the enormous gap created by every single roof tile where it meets the gutters. So around 320 doors over a distance of 65m. The next problem to solve was how they were getting there. As all our drain pipes connect together and run the 70m to the road, there was a chance they were like err a rat up a drain pipe? I'd already fitted grills to a lot of the down pipes to stop leaves, so a few more went in. The only other route is along the pergola. The rose has been growing and had reached to roof this year. As we can't stop rodents scaling the plants, we were going to have to block the holes created by the roof tiles.

There was no evidence of rodents until the corner adjacent to the rose and pergola. Being small, the mice had a nice path on the wall plate. The rats strolled in over the covered terrasse.
Going further along the south side, I noticed a fair amount of mouse droppings. 5 hours toil saw the last of the house protected and the first few metres of the 2 gullies had grilles fitted with the remaining 10m (of 70m)
If possible slide the tiles towards the ridge avoiding the combs then into place; this stops the combs jamming the correct seating of the tile. A wooden chock holding the tile above out of the way helps.

To date we've caught 3 rats which went, in their mobile 'home', to stay with their friends in the forest a few km away. Having caught all the rats we'd seen on the webcam, there was still noise from the loft. This turned out to be mice. The interweb has may reports of rats being hunters of mice, so whether we had mice to begin with, which the rats followed, or the mice moved in just after the rats is anyone's guess. 3 mice were caught very easily, but the scratching continues, but nothing on the camera. At this point the main entry point is blocked, but the rodents could still run around the gutters to find another door. Rain is preventing further work.
Having moved the camera to the area of scratching, we have another mouse. A lazy, or possibly well fed with a good stash. It runs over the trap which I've put adjacent to the scratching and it shows a little interest.
update. This mouse, no 4 is now caught and released. No 5 is very camera shy. Today's cocktail for its delectation is Camembert (what else, it's French) cashew nut, cat biscuit and the firm favourite of apple.
15/3. A further update! The mouse was a rat, but it ignored the trap, baited with prune. I found that one blocked hole in the gable was re-opened, so blocked it with steel mesh. That night there was a noise from the garage. I opened the door the next day. The rat has not been heard or seen since. Hopefully that is now it. All traps and camera removed.
21/3 Heard nibbling again, and a look outside showed 4 fingers missing off a comb. I shoved some metal mesh in that hole (the most inaccessible in the entire roof) and set the rat trap with apple just adjacent. Within a day we'd caught one, but no more nibbled combs.
Looked like a young female. Have re-set the trap and we'll see.
Below is a shot of one of the rats inspecting one of the home made traps. As an idea of scale the hole it's in is 76mm diameter. All the rats were about the same size - say a body of 200mm and a similar length tale.
The trap on the right was the only success and was a hole with a wire taper reducing the diameter in a cardboard box. The photographed rat decided the best way to get the bait (apple & cat biscuits) was to chew its way in. Twice. Got a steel trap after that.
The next trap to the left is a see-saw, but it's too small. Didn't know how big these guys were...
The trap on the left was a electric remote release. Rats are very inquisitive, but not a single rat entered.

Jan 2023. I eventually remembered brick reinforcement mesh.
65mm width is readily tacked on, once the old combs are removed. A pleat is required to fill the hole. I also put some mesh behind the roof vents, but it's pretty unlikely a rat would expose itself climbing up a roof. 11 vents in all.
Just over 4 x 20m rolls did the job.
July 2023. Well, what d'you know. Rats and mice will exposed themselves in a roof valley. Having collected 2 rats, 1 wood mouse and 6 mice (5 in one trap) this week, I'm now busily filling the gaps around the tiles in the valleys. They did mostly have plastic combs, and 1 large hole had been cut. The significant thing was how shiny parts of the valleys were, polished by the rodents coming and going. Finished the 5th roll and took 5.5m off an old roll I've had a long time.
23/7/23 Rats have been busy. Saw 2 inside last week, and they have ignored the trap. However, we've heard them. It the most inaccessible corner of the roof, they have managed to displace 5 bits of mesh. Mesh that is push in place as it cant be nailed due to the proximity to the ridge, and the tiles can't be removed. A bit more reinforcement today might fix them!
Saturday, 27 February 2016
220V LED light strips / rope lights
Feeling in need for a bit more light under the kitchen cabinets, I bought 1m of LED lights from ebay. Where else? It was worth the 10p, unlike the 0.5m 'power cord' which was a further £10 and I'd need to cut the plug off and extend the wires.
The spec was the usual vagueness for 'quality' products and is 60 led/m (5050 leds) IP66 - waterproof!. Digging around a bit (there was a RoHS cert to con you into thinking it was CE marked, lol) the manufacturers site stated 12W/m
There was a bump in the cable and I was suspicious that this did something. A look at the rope showed that the LEDs are not wired to take AC, so I identified the +ve terminal and put ~50VAC through a full wave rectifier 49VDC (8A one from the scrap box, but 0.5A is fine assuming it's rated for mains). This caused the LEDs to glow. Putting a full 240VAC gave a good brightness. Power consumption is around 10W.
DC volts measured 221V, DC current 27mA, which works out at 6W. Why the disparity? Probably the fact that the DC is not smoothed, so the meters are averaging a bit. The peak voltage would be around 240 x 1.4, so say 330VDC.
You have to get the correct polarity, but is shouldn't harm if it's the wrong way around.
I've read that these no-name and often found strips will lose about 1/4 of their initial brightness if run continuously for 2 months or 1440 hours, or a year at 4 hours per day. This is because the LEDs are no-name items, maybe even floor sweepings, or simply driven too hard. Part of the problem is the materials used which go opaque. If you want a nice system to light your house you'll need to dig deep and look for the likes of Philips etc.
If you've found this blog post and think you could also save £10, you need to understand what the technical terms are. Don't post a question asking me to explain, 'cause I won't. Darwin rules.

And the finished article fitting nicely into a surface mounted switch. A 0.8A fuse was chosen as I have a surplus. The connections are mad by pushing 1mm tinned wire 10mm into the rope.
In use, the brightness is a long way from a 12W fitting. Maybe 6W is closer.

Subscribe to:
Posts (Atom)