Thursday 28 December 2017

Jata CA704 Cafetière Demi Expresse

Bought this coffee machine in July 2016. It's been descaled a couple of times, but as we live in a relatively soft water area, I don't pay that much attention.
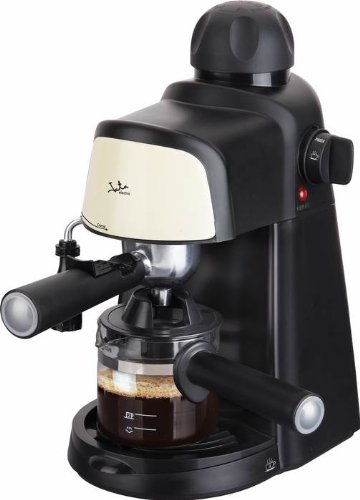
There are a bunch of these machines which look pretty similar in a price range of €25 (Gifi)  to €70. This one has a control board and 12V relay which turns off the heater after ~10 mins.


Jata CA704 Cafetière Demi Expresse 26 x 21,5 x 33,8 cm

It had started producing little coffee. I descaled it and it was fine for a day, then a problem again. Having striped it, it seems scale had caught up in the narrow pipes in the control valve.
To strip it, you need to remove the control knob. This wont come off as it has a release lever you can't get to.
Remove the base. Triangle heads. Disconnect the blue and white wires to the heater. Remove the 4 screws way up inside. 
Remove 2 screws under filler, and gently ease out the silicon seal.
Remove the 2 screws adjacent to the coffee holder
Wiggle the top bit, noting you cant remove it as the knob is in place. Remove 2 screws, 1 each side now visible below control knob.
The top piece and boiler are now free. Turn control knob until release lever (white) is visible inside black knob shaft. Press release and pull knob. I took some material off this so it holds ok, but can be removed with a good tug.

The boiler can be separated. Control part comes off revealing ceramic plates.
Took 3 hours with sulfamic acid (Casino descaler) to dissolve the scale. The boiler is aluminium and there was no noticeable change in the surface finish.
29/6/20 descaled. Filled with liquid twice and ran throigh. Left about 30 mins each time. Knob went very stiff, but ok once cooled.
31/7/20 stopped working. 21R safety resistor open circuit. Replaced with 22R 1/2W + 160mA fuse. Circuit part traced. Cap dropper + FWB, 5V + 12V rails. Looks like a pic - sanded top.

Wednesday 13 December 2017

Bath mixer

Generic mixer bought from Homebase in 2009.
Not massively different to the other mixer on this blog. In the pic below, the hot inlet to the block is on the right (left when mounted)
The cartridge as shown has cold on the RH mesh.
Taken apart as the temperature control seized up due to limescale and little use. There was plenty of grease in the LH threaded part which was moved around to lubricate as needed. Scale removed gently with a screwdriver and finished with emery cloth.
To get the temperature knob in the right place, set knurl to full hot and place grey part such that the 38C limit pin on knob sits just in front of the max temp grey part. When the knob is then rotated it will correctly stop at 38C. Then need to readjust the knurl, so that full cold forces the thermostatic piston to full cold. Partly remove the knob so that it freely turns and turn in the cold direction until you feel the resistance of hitting the piston. Make this point 20C. Then refit knob and turn towards full hot. When it stops, you'll find that by partly removing the knob, that full hot is ~1/8 turn.
If the last part, readjusting the knurl, is not carried out, the piston has nothing to push against, so will only do full hot.
Notes.
In fully cold, the piston is forced ~0.5mm before it hits the stop.
The piston is 5.5mm at ~16C, and extends to 7mm at ~45C
The control knob piston is 22mm at full cold, and extends to 26.5mm at full hot. moves ~2.5mm per 1/2 turn
Thermostatic capsule marked 5701 8H258


Thursday 30 November 2017

Thomas Watt LED lamps

Thomas Watt LED (A+ rated) lamps are branded for distribution in France under an energy saving scheme. There have been 3 handouts. The first was 10 free, the second was 15 free plus €1 for a further 15. The last tranche, this month, is 25 for €1. Oddly you are eligible for each batch. It's not a wide choice, offering 9W ES 9W BC globe, 7W GU10 or 5W SES candle.
These run much cooler than a bunch of Ikea (A rated) LED ones I got in 2013, and use 1W less energy for the same lumens.

The GU10 has 11 LEDs and run at 96V DC/ 0.4VAC, although the HF component was too high to measure with a multimeter.

By comparison, the 10W Ikea ES globe  (had 2 fail within a couple of months of use) have 44 LEDs and run off 30.7V set up as 4 clusters of 11 in parallel. It was the PSU that failed.

Sunday 26 November 2017

Cubster hydro box oil level

The gearbox has always been a bit talkative, grumbling to itself when cold, irrespective of ambient. Last time it went out to collect leaves it was positively reluctant.
The K46 box fitted is sealed for life. However, under 'heavy' use, its oil should be checked and changed. I'd say this ride-on has had an easy life, however, it was worth a quick check of the oil level.
In order to make life easy for the customer, there is no dip tube, or emptying point. By removing the collection tube, and the breather you can almost get to the recommended filling/inspection point, conveniently located under the pulley and fan.
Some variants have an oil expansion vessel, but I've got a breather in that spot. I had to remove that to get to the cap. Again, to help the customer, they fit one-use jubilee clips which are easy to fit in production, but risk injecting yourself with a screwdriver when trying to remove them, assuming you don't stuff the screwdriver straight through the pipe. Once removed, I couldn't get the cap off, so managed to measure through the dip tube and refer it to the cap. 35mm was what it appeared to be. The recommended range is 17-22mm. I added some 5-30 fully synthetic. The forums suggest 10-30, 15-50 or 5-50 synthetic. It's now about 25mm and a lot quieter.
The oil is oily colour, not grey or black.

http://www.tufftorq.com/tuff-torq-k46-oil-maintenance/

A pdf here 
https://www.tufftorqservices.com/instance1EnvEEdefault/FlatHTML/TechInfo/ttcoil/pdfs/cc%20Changing%20&%20Checking%20Oil%20in%20the%20K46AM%20Transmission.pdf

this is a nice post
http://forums2.gardenweb.com/discussions/3541703/k46-oil-change-with-pictures

Saturday 11 November 2017

Dishwasher

Dishwasher played up in Feb 2017. Threw water out through the vent, into the base and sort of flooded. Pump ran continuously. Seemed to be a blocked pipe vent. More notes on hard drive.
Repeat performance 11/11/17, however the cause was not a blocked vent pipe. The DW flooded and the pump ran, but no water emptied. Removed the drain hose, but there was almost no flow. There is a NRV on the pump, so it wasn't possible to blow to clear the blockage, but careful sucking cleared it out. 
After strip down, it turned out 2 cardamom pods had got past the filters and were blocking the pump inlet, and there was plenty of other gunk. The pods would not have caused the over flow, but is shows that large bits got past the mesh filter and blocked the outlet pipe, or possibly the impeller.
The bits get easily past the mesh filter when it's removed for cleaning. The filter mates with the base, so large parts on the pre-filter simply stay on the base, and never get cleaned out. When the filter is dropped back in, they can drop straight in to the pump. Cardamom pods swell nicely and block the small pipes. 

23/1/23
DW started to fill then stopped. Lights still lit. Power cycle resulted in a crack, and no lights.  I could smell the magic smoke. The circuit is easily removed. 4 screws (leave the central 2 in).
A LNK365PN from 2011 had a small crack and had 15R D to S. I only have LNK306 and they cannot provide the 1A the 365 can. A quick check and the ATMEGA 8L runs off 5V, and the pot div on FB pin has 2k/4k3 which works out to 5V with 1.65V on FB.  The app note shows only isolated circuits, but this was wired with 320VDC onto pin D, then a choke wired D to S.  The other weird thing was the -ve side of the input cap was wired to +5. I didnt track it as I didnt have the spare and the DW was full of stuff to wash.  I took a 1A USB psu (repaired last month, not terribly good 4.6V and won't start if load > 0.8A) and wired that in instead.
I feel the choke configuration may have saved the electronics.

Friday 10 November 2017

HDD enclosure

The hard drive failure was confirmed after the purchase of an external sata case


It's a really nice case for 2.5" drives. This one was €5, the usb2 one being a few cents cheaper.The controller is a innostor is621 which, despite some adverts stating it, is not UASP/ SATA. It connects as a bulk transfer drive (Win 10). The manufacturer's web site doesn't state it either, and I can't find a datasheet.  

However, the Maxtor M3 drive I bought is UAS/ UASP, but tops out at ~20MB on usb2. Odd, considering it could be 480Mb/60MB. Write cache was off (normal) From a few searches, plus info from CrystalDiskInfo, plus a teardown video, the drive is Seagate st2000lm007 (mobile HDD), with a 128MB cache, 140MB/s, SATA 6Gb/s.
https://www.seagate.com/www-content/datasheets/pdfs/mobile-hddDS1861-2-1603-en_US.pdf
Nice review here
http://goughlui.com/2016/09/28/review-maxtor-m3-portable-4tb-usb-3-0-external-hard-drive-hx-m401tcbgm/
Crystal Disk Mark Q32T1 shows 32MB read regardless of cache setting. The write improves from 28.5M to 30M with cache on. Seq write test was actually 6MB worse with cache on. The above review shows 41MB normally, plus a massive improvement to 100MB with cache on. USB3 makes a lot of difference.


Sunday 29 October 2017

Hard drive failure

A few years back when I went to Windows 10, the PC seemed to run a bit slower. I sort of expected that, a W10 was bigger and took longer to do stuff.  It's been like that since Windows 3.1; a more cynical person might claim that it was a deliberate ploy between Intel and Microsoft to increase sales?
This got worse and worse, with disc usage being really high. Damn Windows. I eventually bought a SSD (Evo 750 256G) about a year ago. I installed it along side the HDD and it just sat there for storage. Well, the PC certainly speeded up. 

However, this latest Fall Creator's edition seemed to slow everything down again, particularly start up and shut down. I didnt think any more of it until I decided to clean the HDD and remove it. It was taking over an hour to move 100M bytes. I found the usual whining about how Windows 10 was the worst ever, and its disc access was so slow. I'd already tried all the solutions in the past, so quickly skipped to new solutions. There weren't any, just the odd post about impending HDD failure, which fitted with my observation; the drive would read data fine, then drop to 0B/s for 30s, then read ok. Windows disc manager showed it was OK. Another utility showed reallocated sector count is 1992. It's a 500G, so that's a lot of storage gone. I've had it for 5 years and manufactured 6 years ago.

This is my first personal HDD failure; I've owned about 15 HDD, the first costing over £100 for a 1.3GB in ~1993 (you can get around 4TB for £100 now, and it's a lot faster) I remember copying a CD onto it and having half left; but this was when Windows only took a few MB. I've also had one fail at work in 2006.  It turned into a proper coffee grinder. The support staff didn't know what a HDD failure was, so that tells you how uncommon failures are; they supported about 1500 PCs.

Now the disc is out of the PC, it's running a lot faster. I imagine Windows was updating the drive status on the HDD which was taking a long time to complete.

Friday 13 October 2017

Broken basket full buzzer - Cub Cadet

I managed to overfill the bag 5 times today as the buzzer for bag full had broken. Really annoying as the deck starts shaking and dumping grass. Then even when the bag is emptied, the chute is rammed full and isn't that easy to clear.

The bag full assembly 629-1089a is 1 item consisting of a switch and very loud buzzer. A snip at €100. My junk box didnt have anything close to replace the buzzer. The buzzer is a mallory ps-551q, 105dB, available at mouser for €10.
It turns out the buzzer was taking 1A, the spec is 0.2A. It comes apart easily to reveal a large piezo and a THP pcb. A 4011 drives a few transistors, a small transformer and the piezo. Having tested the actives, I put a probe on the 4011. Dead.  A 20p item in the '80s when I used them for various projects and still a few in stock. Probably £1 for 10 now. A quick swap and all was back to its deafening old self. Consumption was around 0.15A
Not a bad saving for an hours work !

Monday 9 October 2017

Deck removal - Cub Cadet CC1016

I couldn't find a video anywhere for removal of the deck where a catcher is fitted.

Remove upper cowling belt protection both sides. Note lhs near rear wheel has 2 bolts, not 3 - look carefully. 5/8"
Remove catcher, remove sliding metal clearing plate, then remove long tube down to deck (2 small r-clips + dowels)
Put some wood left to right under deck, then drop the deck
Pull J pins near rear wheels (on deck) - note for replacement, use the top hole (bottom hole marked 42" deck)
lhs remove 2 front bolts holding bottom deck cowl in place and pull it free a bit.
rhs a bit awkward, but 2 bolts holding bottom deck cowl. They are on the deck. Pull free, else can't do the next step
roll backwards until the front U is clear of bracket
Jack up the front on the bumper about 100mm. Check U is well clear. 
Remove large deck spring rhs near rear wheel
Remove belt off clutch
Raise deck lever
Either slide the deck out, or using a trolley jack you can roll the front sideways. Sliding is quite easy and safest.


Checked all pulleys on deck and drive. Large idler is shot. Small is ok.
Drive pulleys are all but shot. Looks like you can't just change the bearings as the pulleys are welded together.
lhs rear V pulley on dedicated bracket 6203RS NHI-3. Boss on one side 16mm, od 20.5, id 9.7. pulley id 31.5, od 77.8mm. 756-0236, a snip at €39.60
idler, flat sides, on moving drive engage plate 99502H. boss on one side 13.4, od 19, id 9.7, pulley id 69, od 81. pretty sure it's 756-04224 but od doesnt match. There are 3 of them. A bargain at €21.30

Sunday 8 October 2017

Sunday 24 September 2017

Cubster cleaning

Took the rear wheels off and removed about 20 litres of grass from the top of the deck and gearbox. White greased all visible mounts, and this was enough to stop the reverse lever jamming on.
Installed roll/pitch monitor. Also gives engine + gearbox temp and revs.
Backup hour counter saves running hours every 30s. Bit easier to use than the built in one which works in decimal hours eg 10.1 hours is 10 hours, 6 minutes.
Can also open the gates remotely.


Sharpened blades. Torque to 80lb
Stretched leaf spring on clear out system. Hopefully this will stop the lever disengaging

Firewood

It's beyond that time of year again, so I'm chopping and splitting to re-fill the wood store. Don't really need to this year, but there is quite a lot of birch that needs using up before it turns into dust.

Saturday 23 September 2017

How not to treat a grass collector

If you want to spent an afternoon bending 25mm steel tube back into a precise shape with long pieces of wood, read on.

Whilst cutting under shrubs with the ride-on, it seems as though the grass collector emptying lever got caught up with a branch. As this lever is made from 25mm tube, you can run a car over it and it won't bend. However, the torque in a 600cc twin means that the force gets transmitted to the next weakest thing, and this is sufficient to wrench the collector off the rear of the ride-on, dump all the grass, and re-work the frame into something approaching a Christmas novelty toy. The bottom would lock in, but the top frame was too twisted to get close to locking by about 50mm. Closest on RHS.  RHS was badly bent, and I used the LHS to get the shape back. Then removed the twist to get the top bit to bit into the catches, then re-bend the RHS to get the top cover to fit.


The left of the picture is RHS on the mower.

This 25mm tube frame is manufactured to a tolerance of around 1mm to ensure it fits and locks to the ride-on correctly. I'm not convinced it's back to the original shape as I can't say I've ever spent time admiring it. It does fit, and works ok now. Just need to weld a support bar back on and paint all the bits of powder I've scraped off.
All the 25mm tube is 2.3mm wall
£124 to replace it

Monday 18 September 2017

Motolug trailer


Just come back from a 1400km trip with the trailer and 2 bikes. The bikes did 810km.
2 new tyres for this trip, and 1 bearing.
Going, the mt07 on the left and mt09 on the right. The mt09 didn't fit into the loading system properly and I had to drop the rear holder back a notch. Coming back, the mt09 went into the left side by mistake and wouldn't fit as the holder was set for the mt07. However, once strapped up, it fitted easily. Note that the front part of the loading system on the left side is marked and must be fitted on the left side. The rocking part has to go with the double rubber protectors facing the rear. The manual is silent on the correct way around, and most of the photos of that part have no rubber bits. The one photo that does, shows the rockers the other way around. I tried the mt07 the 'shown' way and it won't work. Both bikes have the same tyres 120/70 17.
1 bar strap, 1 strap on each swing arm, a front tyre strap to the ramp and a strap over the seat. Front tyre strap was added as I saw it in the manual, but should probably have been on the rear tyre.
The bar ends knocked going, and I had to put pipe insulation under the bar straps. Also the 07 wouldn't stand up and leant to the left, the 09 leaning a tad too.
Coming back, I compressed the 07 suspension a bit more when fitting the seat strap and the bar sat under the 09. The bikes hardly leant and looked way more stable.
Consider using some of the sticky matting on the seat in future to increase the friction.
The loading ramp system is still pretty hopeless and the rear will not touch the ground/reach the upper notch on the tow ball without it lifting the car up ie forcing the car suspension up through the tow bar. Need a further loading ramp to fill the last 10cm.
Currently have a mix of 8" tyres. Spare is original 2008 and in fair condition. 2nd spare is poor from 2008. 1 new rim+ Kingstire tyre kt-701 4.00-8 range C from ~2012 rated 6 ply 71M 345kg/130k 3.4/50psi, but the rim is only good for 265kg (this is apparently normal for 8" rims??) plus another ETG 4.80-8 62N 3.1/45psi tyre from Norauto September 2017 (?dated 11/16) which is 4 ply 265kg/130k on the original motolug rim fitted LHS. Old tyre badly split and worn. Motolug email states this is most likely a factory defect on the trailer suspension, but contrary to UK law, they refused to replace it or offer a cost price spare.
4" pcd. Shafts are 1" Spares are uk only
August 2017 replaced outer LHS bearing with no-name whilst waiting for better replacement. Very noisy with visible damage. Had to fit a 2nd washer to get castellated nut in the right place to reduce float. Oct 2017 replaced inner LHS with challenge bearing and pumped it all full of grease. Say 2mm float. Previous one was noisy and had thrown grease over rim.
RHS was tightened 1 notch, but still had a bit of float - say 2mm with the tyre under load.
Both tyres are now half worn after 1400km. ETG tyre has noticeable (1mm) edge between radial tread on inner side.


Monday 14 August 2017

Sunday 13 August 2017

West hedge

The hedge on the west side cut from the bamboo to the deck ~30m, ~2.5h including clearing up. Top cut to ~2.5m. We'd let it grow to block the view of the new house next door, but it's over 4m in places.
I'll need to go back once the blackberries have fruited and finish the last 10m, plus the far side of the top of the hedge.

8/10 4 hours spent cutting the rear portion of the hedge to ~2.5m. 4 trailer loads.

Loading ramps

To get a ride-on on a trailer, you could lift it (only ~260kg) or get some ramps.
For a few years I've used 2m long, 40mm thick low grade timber, for a lighter mower (170kg)
With the new mower, plus me driving it on (ever tried pushing 260kg up a 20% grade?) you're talking ~340kg. A bag full of grass on the back adds another 50kg or so. The planks worked ok, but did deflect around 40mm. Pretty heavy too at 10kg each

I saw these folding ramps for €52, made by Arebos (China). They are good for 300kg each. 1.8m long/~95cm folded (even came with a CE certificate ;-). Build quality is firmly average, with an hour spent removing sharp edges, plus, more annoyingly, little metal spikes on the grip pattern. The tread/grip is great, and is manufactured by punching upwards with a W shape. Unfortunately if the tool is off a bit, you end up with pointed 2mm spikes at the ends of each tread piece. With good tyre tread, I doubt it would puncture the tyres, but with ride-on tyres costing almost as much as car tyres, I'd prefer them to not have tiny knife cuts. That, and I might use these to load the motorbikes. 
These deflect around 10mm with the ride-on rear axle and me at the hinge (~120kg), and the sides bulge a little. 8kg each. They don't appear to be galvanised (not mentioned in advert when I bought them, but others state this) Time will tell.

Arebos 2x Rampe Pliable 600 Kg Rampe De Chargement Rampe Rail Contrôle Rampes

Sunday 6 August 2017

Erde 102 Trailer maintenance

Nothing for nothing in this life.  You buy a trailer in 2004 and suddenly it needs new bearings. I'd noticed play on the LHS a while back, so decided it might be time to check the sealed bearings. It's a quick job once the nut covers are off (Erde part 2325 0003) one of mine is a new interesting shape, like Kryton's head. It took a massive amount of pummeling, then 24" stiltson (not sure that helped) and more pummeling to get it off. The other one will wait until the new bearings arrive.
Both are metal shielded. I'd have thought rubber sealed more appropriate for road use.
Inner VB C3 6202Z approx 14.85 x 35
Outer HJB 6004ZC3 approx 20x43

The LHS nut was at about 40 lb torque, RHS about 35. This site recommends 21 lb. 
https://www.westerntowing.co.uk/acatalog/How-to-Replace-Erde-Trailer-Bearings.html. Loosening and re-tightening to the same point showed about 30lb.

The LHS outer race is about as smooth as tarmac. Inner seems fine. RHS outer was a bit lumpy too.

It's back on for now and will need to be on light duty. The trailer has been <coughs> used at its limit a few times, so it's not surprising.

Update 27/8/17 
New bearings fitted. LHS is tight and spins slowly. RHS is fine. Tried swapping them left to right, but it was the same once they were torqued up, so left LHS just nipped
Getting the bearings out is challenging. I started hammering them out, but then realised that the hubs are alloy, so will crack quite easily. I then got some threaded bar and pressed them out. I didnt have a big enough socket, so a bit of square tube did the job.


Erde fitted no name chinese C3 bearings 6202 Z / 6004 Z. The shaft machining seems to be medium tolerancing, needing c3 ie big wiggle fit. Oddly, c3 bearings are more expensive than normal fit. I've replacing with MTK normal bearings,  which are 1/2 the price. Ie €9 vs €23 for both sides. So that's why the wheel is not spinning well!

RHS

LHS


Old bearings. Top is RHS. Nice rust patches on both


Neptun Trailer maintenance

From new (2015), the left side wheel of the trailer when hitched, sitting in the car, had a bit of play. A friend had a hub fail when towing last November, which pushed me into a rush inspection today.

A castellated nut and 3.6 x 36mm cotter pin fit on a taper bearing.  The cover tapped off quite easily and snapped back with a tap. The nut was loose, so for completeness I removed the taper bearing and hub. No marks. Plenty of clean grease. Nut went back on with the original pin at 12 o/c. No play, and the nut wasn't loose enough to turn with fingers before being pinned.
Leaving the wheel on the hub was probably a mistake as it made the assembly heavy when re-assembling. Best to do the job on the ground.


Taper bearing and washer removed and put back in axle


Rear shot of seal on taper bearing. It was tightly in.


Taper bearing and nut removed

Tuesday 18 July 2017

Ride-on brands


Ignoring the commercial type machines, eg Iseki and Kubota, the seem to be 2 brands in Europe (France).

These groupings were made based on photographs of the machines. In general, you can see the pattern of the basket, the protection around the deck and the seat. Controls vary, but not much.


Group 1 - American
MTD
Husqvarna
Best Green
Club Cadet
Electrolux
McCulloch
Wolf

Group 2 - Italian - GGP
Alpina
Stiga
Sabre France/SARP/Castel Garden
Univert/Sentar
Colombia


I found the GGP machines a bit plasticy and flimsy. Compare the weights. I saw a Sentar Montreal (Kawa twin) at €2590, but the bonnet is so flexible.  The never-used model in the showroom already had part of the basket seal coming away. The GTR B is a more solid machine at €2390 (B&S PB), but you'll find the Alpina AT7 version for €1900. The dealer was prepared to discount €90. You'll be better off with the Husqvarna CT138 with the B&S Intek, pressurised oil system + filter, 98cm at €2400 + del.
AT7 can tow 100kg. The larger American ones can tow 180kg, with a nose weight of 25kg.
Rear axles on them all varied between the Tuff Torq K46 or Hydrogear. Both American, both good reputation with lots of spares and repair kits.

The only other economies I found were the engines. The GGP engines are made in China I was told, but what isn't. Still reliable though. Very little on the forums, so that confirms it.
B&S do a series 3 & 4 in 2 flavours. Intek and PB (power built) It's next to impossible to get an informed explanation of the difference between Intek and PB, but a lot of GGP stuff has PB, so that tells you it's cheaper. The Kawasaki 603cc 481 is made in USA.

Alpina gear is often heavily discounted and being white, stands out a bit in the garden.

July 2017

Err. Another ride-on


The increasing number of planted items in the garden is meaning me spending more time moving 5th to reverse more often than I'm straight running. A hydrostatic box beckoned. Of course, if your going to have a hydro box, you may as well get a rear collector too, as they are also marginally narrower without the side discharge. And a bigger engine to cope with the losses in the hydro box - well, it goes without saying.
Welcome to the 3rd ride-on in 7 years. Cub Cadet CC1016 KHE. This one is ~4.5 years old and has only ever cut ~1500m2 (google maps calculates ~1100m2). There is still stacks of rubber on the tyres. The hour meter is 139 hours, but the guy told me he'd left the ignition on until the battery went flat - probably 1.5 to 2 days. If you said 80 actual hours, 20/year, that is slightly more hours than 'we' cut, but I got the impression he cuts weekly. This does tie up with the oil change intervals. He changed the oil+filter for sale as he had already bought it. He is moving house in September, but decided to sell it now. I did find an ad for his house in LBC, plus his hunting lodge.


In Feb 2013, the retail value was €4079, on offer at €3399 and the guy paid €3200. I paid €1550. He said the local dealer was sort-of a friend had offered him €1400 (if he bought a trailer from him) and he would sell it for €1800-1900 ie +30%, which seems to be the margin on new ones. My local dealer had only 1 small used ride-on for sale, and he hardly ever had ones with collectors as they are the most sought after. The other local dealer had nothing (again) and only GGF made machines (see other post on brands)


Maintenance.
I'd say it's never been to a dealer for a service as there isn't much visible grease. That and there is no service receipts. The guy is meticulous and keeps everything. He gave me the folder with manuals, spare key, receipt etc. The oil is noted as changed :-
Date        hours
12/5/13    5
1/4/14      20 oil + filter. Motul synthetic
13/7/17    139 oil + filter. Oil type? Clean. Filled to mid mark.
Oil change interval is 100 hours, 200 for the filter.
Don't screw the dip stick in to measure level.

Air filter is very clean. He said to replace it when it's black, but I'd say it's original as it's OEM.
No fuel tap
There is a voltage reg on the engine.  Will need to test it.
19Ah MTD probably original battery. Standard size 130 W, 225 L, 155 tall. Volts low compared to a 30Ah.
14/8/17 Battery still good, but swapped and sold. 'New' battery is 30Ah Yuasa 1 year old (2/5/16) from another ride-on. Terminals on the wrong side meaning the cover fits badly, but ok.
Wiring for a oil pressure gauge, but the dash has no light and no sensor on engine.


Hour meter.
Made by Delta Systems Inc. Uses a PIC16f677. Fully protected code + eeprom. User ID 7f 7f 7f 7f. Checksum 0303. 

Looking at rear of pcb, 8 pin conn at bottom, there are 5 THP not coated. Top left dat, next to the right 0V (obvious), just below clk. Bottom right +5, above to the left mclr.
Power. Rear. Top row, RHS, 0v - obvious. +12 top row LHS.
Tried 2- 10 power cycles in 5s. no reset. It counts to 800, but it's not clear if it then starts again from 0.
From the mower schematic, front of pcb, bottom row, LHS, square pin in 1. Pins count to the right to pin 4, and pin 5, 0v, is above pin 1.


Monday 12 June 2017

Cat feeder

Iq=0.06mA, 0.37mA whne led flashes
Low battery light ~5V
~0.7A when feeder motor runs (@4.7V)
~0.16-0.21A for vibration motor

Use Casino 'tous les jour alkaline' 1.63V new, 1.615 after 2 weeks use.
Tested at 4.7V below 0C for 9 days OK.


New 2014, probably.


Wednesday 17 May 2017

Li-ion batteries

Flying.
No restrictions below 100Wh.
Possibly a max of 2 per person.
Have to be in hand luggage, unless installed in the appliance in the hold.
Compulsory above 100Wh, but recommended to tape up the terminals and put in poly bag.

1 cell
3.7V nom. 4.2 charged, 3V cut-off, but 2.7V OK 
2 cell
7.4V nom. 8.4 charged, 6V cut-off, but 5.4V OK 
3 cell
11.1V nom. 12.6 charged, 9V cut-off, but 8.1V OK 

ok to constant current charge at marked capacity for 1 hour, but lower better. Cut off when current drops.

Capacities at Feb 2017

Bosch 11.1 3 cell 1.3Ah ~2008. ~1Ah.
Dell laptop 6 cell 11.3V 4700 orig. >2Ah left Charger 90W, 1 hour, so ~5A
New 'elfeland' 3.6Ah. mass too low, sound hollow. ~1Ah.

Examples. boot heater, 33 ohm each (normally 17R)
2 cell, 7.6 cut off (1.76W)
I = V/R = 7.6/33 = 0.23A each
hours run = Ah/A 
For 1.3Ah, hours = 1.3/ (.23 x 2) = 2.8h
3.8Ah = 3.8/.46 = 8.3h
2Ah = 2/.46 = ~4h, but in practice get >6 hours on pwm as the higher start voltage means a lower current draw, and in general full power not required (3/4 power ok in cold weather)

Japan 2017
Dell 12V/2Ah 17R each heater
PWM used to reduce demand. Had to re-scale software to give full power as a percentage of max - 25% - but check.
the 3/4 setting of this new max was enough


PV array low IR

PV cable went low IR. Inverter warns below 1M. Got down to 600k without shutdown.
After about 6 years in the ground a joint got water in it. 
Replaced it with one length. Just under 16m, allowing 1m at the panels.

Tuesday 4 April 2017

chainsaw mini service

Having blunted off a chain cutting  a stump, in putting the sharpened chain back on I realised that I hadn't checked the clutch in a while.  Block cylinder, LH thread and off it comes.  Bell was quite oily, as was the clutch.  Removed worm drive - a slight bit of lead in thread missing and a few tiny pieces of plastic.  Turns easily and oil is being used at the correct rate.
50Nm to re-torque, except my wrench isn't left handed.
Fuel cap was leaking which turned out to be grot in the fuel tank on the seal.  Emptied and cleaned tank and replaced fuel filter.
The air filter was changed too, which largely stopped the stalling it does when started hot.

Sunday 12 March 2017

Constant current / constant volt PSU


The PCB is the standard XL4015 CC/CV board; usually it has 2 pots and 3 LEDs and sold as a li-ion charger, but there is a variant with just 2 pots. I've been using it to charge batteries and as a general lab supply for low current stuff.  It's tiny, even with the displays, but I knew it was only a matter of time before some crap on the bench shorted it out, or wires fell off.
I use it with an old 18V/5A laptop supply which is way in excess of the output power, put it means I can get to 14V ok for charging. 
I didn't need the LEDs, so I removed them and re-used the spare 1/2 of the LM358 to make a x20 DC amp for the current display.

The chip is good for 5A, but the op-amp isn't rail to rail, so current limit wont go much beyond 4.5A; the display won't read above 3.7A.  This would be an easy fix using something like LMV358. Wish I'd spotted that before removing it to modify the pcb.

I got instability on the output as the main cap is before the shunt (on the -ve rail) A 100/25 fixed this, but means the output is now limited to 25V. 

There is a biased switch to allow the current limit to be easily set, rather than starting high and winding the limit down.  Going the other way won't allow most gear to actually start.

The chip is quite efficient - say 80-90%, but it does run warm with a high input to ouput volts ratio with a few amps.  A copper tab was soldered on to the regulator to get the heat to the case. Don't be temped to put on a heatsink; it would do very little in such a large volume and fail to convect.


The case is 80 x 55 x 25.  It's a bit tight and you can see the input terminals have gone and 1 cap is on its side, out of the way. The displays are just the cheapo 70p ones off ebay, modified to improve accuracy - see other blog posts, hot glued in place.  I'd have preferred to mount them under a clear window, but I already had the box.


Thursday 16 February 2017

Boot heaters

Carper/flat cat 5 used to run from the heater to the connector on the cuff.
This is the amount of insulation to remove allowing it to pass through the barrel connector; it is rubberised, but not very compliant. There are exposed cores after the case if screwed on.  Heatshrink required to cover the gap.


Routing on the sole


Joint on to the heater


6 x 100R 1/2W resistors, carefully soldered onto stranded wire. Solid wire has historically hardened and failed very quickly


4/12/19 Both 0V wires failed where they pass through each insole. Used a longer piece of stranded wire to solder between 2 resistors in case the solder had wicked and the wire work hardened.

Sunday 15 January 2017

Hacking LED voltmeters

These LED voltmeters are cheaper than the 7 segment modules!


They come scaled typically 0-100V. The linearity is awful below ~1.0 and accuracy is around 10% above 1 and -10% down to 0.5 when it's around -20% These particular ones have had the part number taken off the microcontroller, but it's a safe bet they have a 10 bit ADC to cover the wide voltage range.  One nice feature of these is that they autoscale below 10V, so you get 9.99V then above that 10.1V up to 99.9V. The resolution +/-0.03V (0.02 on 1 module I have), so below 10V don't expect too much. Some modules out there only have 1dp and right justify the display.


I've marked the signal path from the yellow input wire. Basically it goes through the 22k pot, through a 20k 1% (marked 30C), then a 3k9 (marked 58B) to the adc input and also to a 1k (marked 01B) to 0V.
Or to put it another way, there is a potential divider of 23.9k of fixed resistance and a 20k pot in series, and a 1k to 0V. Assuming the pot is mid-position, the ADC input is therefore Vin (1/1+11+20+3.9) or ~0.0278 or (1/35.9)
I needed a 0-5V input to read 0-15 ish. A 18k across the 20k & 3k9 achieved this.
The basic accuracy at low inputs can be improved at the expense of having the meter flicking from 0.00 to 0.02 with no input.  For the above mod, a 1M resistor from pin 5 to 8 (+3v3) means it reads with less than 1% error to at least 4.0 (didn't test above that)
For an unmodified meter, a 1M5 does the same to 12V (didn't test above that)