Tuesday 23 April 2024

Counter-flow chiller

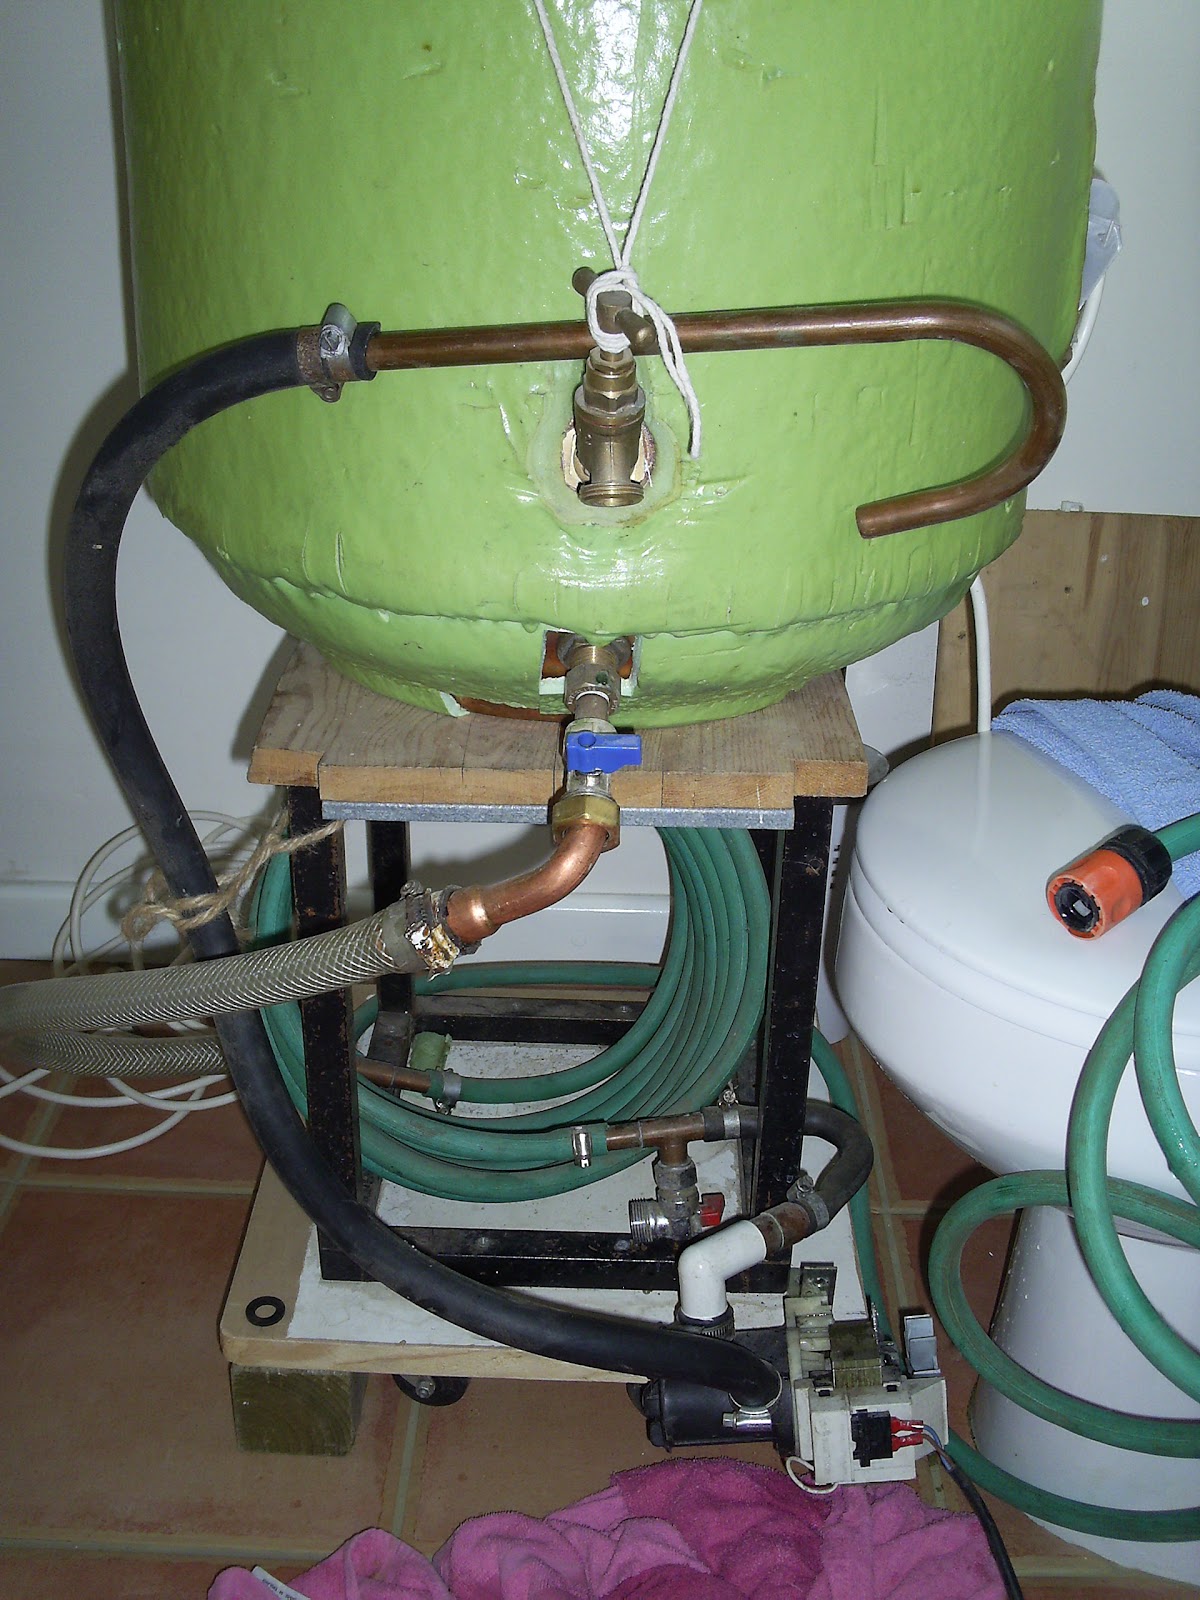
Back in July 2006 I built a counter-flow chiller using 1/2" hosepipe and 8m of 8mm copper pipe giving an area of ~0.2m2. Gravity feed wort, and a washing machine pump to pull the cooled wort into the barrels. This sat under the stand which held a modified 115L direct copper cylinder. It worked well from what I remember and I think it used less water compared to the immersion chiller.  I didn't really have much choice as I was trying to cool 85L of wart. I sold the lot in 2009. No notes, just a photo below.

I'd been thinking about a plate chiller as Vivor has a 40 plate at ~53€. More reading suggests they are a pain to clean well and block fairly readily. About 1m2 area.

Roll on 18 years to April 2024 and I'm rummaging in the garage. I see 7.6m of 22mm polyplumb pipe I'd removed from the house last year and 2 x 4m coils of 12.7mm OD ac pipe I'd been given. A few hours later my brain says counter-flow chiller. Approx 0.32m2

Twisted approx 14m of 1.5mm copper wire (od ~1mm) onto the pipe and soldered every 2m to create turbulent flow. Must break up laminar flow for best cooling. Didn't pass through the polypipe insert at the copper joint (flared out pipe). Cut and re-soldered wire. Pipe inserts restrict CW flow. Cant increase opening. Used plenty of cable lubricant. Lead free solder and new flux for the join. The rest was lead solder which is lower temperature and better flow for non-standard work. Wet rags kept the heat off the plastic. 

The wort outlet at the bottom is a 22mm right angle compression to 3/4" BSP with a 12.7mm hole drilled to allow the wort pipe to pass through, then soldered. After being coiled up at a diameter of 502mm (to make it fit with both inlet and outlet at the right place) it largely self held, but it's pinned into a frame. Then a 22x22x15 compression was put on the other end (the wort inlet). It would have been a equal T if I'd had one that also had a 3/4" thread. A 22x15 reducer was soldered into place to terminate wort pipe. A old piece of 1/2" copper provided the reduction from 15mm to 13mm. 1/2 to 3/4" fitting gave a water connector. The wort inlet slipped nicely onto some silicon tube that goes to the boiler. The wort inlet had another piece of 15mm reducer and a 1/2" BSP female for the connection to the pump.

3/4 BSP fittings are for the cooling water. All tested to 2.5 bar. The polypipe has a min radius of 8x22mm = 176mm. Settled for 250mm as it is tricky stuff to handle. The copper was soft annealed and was already in a 400mm diameter coil. The polypipe is good for occasional 100C.

Pressure test of the finished coil

Warming polypipe in the sun

Joint at 4m

wrap of copper wire ~100mm

If I do this again I'll probably get 20mm PER which is also rated to 100C. The fittings are either crimp or slide and I'd look for compression onto the copper.

Back to 2006

First attempt at the counter-flow chiller

Washing machine valve put in right at the bottom. CW in front right, meaning the hot water out is the hose pipe just visible on the right. Crystal/braided hose for the wort in. The copper hook is the wort out to hang on the barrel. The tank is about 47cm diameter, putting the chiller at about 30cm. ID of hosepipe is 12.7mm, so a 10mm copper pipe sounds too big. Assuming 8m of 8mm pipe this gives an area of 0.2m2. A 10mm pipe would give 0.25m2.


Research. Some notes on NAS

NB If using plastic/rubber outer be careful not to block cooling outlet / too high pressure else could rupture.

http://www.theelectricbrewery.com/forum/viewtopic.php?p=327899 some theory

https://www.thegatesofdawn.ca/wordpress/homebrewing/wort_chiller/ tuto

Other chillers

https://fr.aliexpress.com/item/1005002900523594.html Rubber

https://www.kegland.com.au/products/coolossus-passivated-stainless-steel-counter-flow-chiller-heat-exchanger

https://brouwland.com/fr/refroidissement/20087-refroidisseur-a-contre-courant-brew-monk-counterflow-chiller.html

cools 20L to 20C in 5 mins. 9.5m 10mm SS 

From a review : wort pipe 10mm od (0.3m2 area) , water pipe 14 id


Wednesday 21 February 2024

Pond (again)

 On the 4th May 2013, we built a pond using a 4x4m underlay and liner. The pics are here

G:\photos\Garden\Pond\Construction


We'd been suspicious that it was leaking for a few years and finally bit the bullet and changed the liner. About 100 common newts, 7 marbled newts and 3 midwife tadpoles were temporarily re-homed along with a lot of other wildlife. The old liner did have a hole - looks like a mouse. The old liner was a woven affair with a plastic coating. The UV weakens it and it can then tear if pulled.

However, we also had a natural spring and this, along with heavy rain was pushing the liner out. 50mm of hardcore at the bottom got rid of the soggy clay. A 8cm drainage pipe was dug from the bottom to let any water out. EDPM 1mm liner and 300g/m2 underlay.

Carried about 600L of rain water up, plus say 300L from the temporary pond got the level approaching the top. Temporary pond followed the contour of the land and was a new 3mx3m tarp. Boards and concrete blocks (~10)


https://boutique.aquatiss.net/bache-bassin/200002-bache-epdm-bassin-feutre-protection-300gr-etancheite-bassin-baignade-naturelle.html#/200002_dimensions_epdm_bassin_1_mm-4_57_m_par_5_00_m

EPDM bassin 1 mm + feutre de protection PECT bassin 300gr/m² (certifié CE)

Largeurs de l'EPDM : 3,05m  / 4.57m / 6,10m / 7,62m 


Largeur du feutre géotextile : 3 ou 6 m. Le feutre est découpé dans la longueur.


LA BACHE EPDM BASSIN

L'étanchéité pour bassin en bâche EPDM (éthylène-propylènediène-terpolymère) est un élastomère (caoutchouc synthétique obtenu par polymérisation) qui offre une très grande élasticité (400%), même à basse température.


Utilisations 

La membrane EPDM est utilisée comme système d'étanchéité dans la réalisation d'un bassin de jardin ou d'une baignade naturelle. Elle est posée sur un feutre de protection 300gr/m² pour la protéger des éléments du sol pouvant l'abimer.

Avantages

Grande élasticité

S'adapte à toutes les formes de bassin

+ économique qu'une coque préfabriqué

Durée de vie : 50 ans

Résistance anti UV / rayonnement / ozone / oxydation

Installation : toutes saisons.

Installation

On peut envisager une installation en plein hiver, elle reste tout à fait malléable et garde ses propriétés mécaniques jusqu’à -45°c.

Sa longévité est garantie pendant 20 ans.

Ce produit est recyclable, il ne dégage pas de produit toxique à l’incinération et reste inerte dans l’eau, le sol, et à l’air. Le collage s’effectue par vulcanisation à froid.

Découvrez toute notre gamme d'accessoire pour l'assemblage et le collage de votre membrane EPDM.


GEOTEXTILE DE PROTECTION 300gr

Géotextile non tissé en polyester coloré, aiguilleté et calandré. Produit sans utilisation de liants chimiques.

Feutre de protection certifié CE PECT300   300 gr/m² en différentes largeurs.


Les géotextiles de protection sont utilisés pour protéger principalement les systèmes d’étanchéité tel que les géomembranes, bâches de bassin, liners de piscine, complexes drainant, et tous autres matériaux ne pouvant pas supporter les agressions plus ou moins prononcées des sols, des bétons ou tous types de matériaux poinçonnant. 


Caractéristiques 

Marquage CE, 

Couleur : grise, 

Fibres polypropylènes insensibles et résistants aux agents cryptogamiques et fongiques.

Résistance à la traction : 15 kN/m

Résistance au poinçonnement dynamique (mm) 15 mm

Résistance au poinçonnement statique pyramidal (N) 200 N

Résistance au poinçonnement statique CBR (kN) 2,20 kN

Vous pouvez également commander ce géotextile seul dans notre rubrique "Feutre de protection bassin". 

Friday 9 February 2024

Bamboo

Kind of regretting planting bambou phyllostachys bissetii (just found the label) in March 2010. It was such a sweet little plant and we're sure it said it wouldn't spread much. It's now about 10m x 4m. It is classed as a running type as opposed to clumping. Some sites describe it as a vigorous runner, but that doesn't seem to be the case for us on clay in southern France.

Every year we remove new shoots and it's usually several hundred. 2023 gave ~560. 1 popped up in the middle of the drive, so I felt it was time to investigate. A trench revealed 8 rhizomes under the concrete drive.

There is no commercial product to kill rhizomes (possibly stump killer) and glyphosate only works on leaves. We'll be chopping the rhizomes off and watching for new growth.

 Almost every year our neighbour has told us a story of bamboo appearing in his house from his neighbour on the other side. Luckily it's a long way from his house...

I've just dug a test trench and it looks like I'll 'only' need to trench down to 0.5m to install the barrier. The soil is almost normal there and from the 2010 pictures it is firmly clay.


20/3/24 Dug a trench about 13m along all around the bamboo. Had to cut out 3 large parts, one towards the ditch and 2 towards the large rock. I had originally decided to trench more towards the drive, but decided that the level changes would be too tricky to bend a barrier around. Bought a 1mm barrier from here https://barriere-anti-racine.com/sol-standard-1-mm/126-569-barriere-anti-racines-eco-1mm-speciale-bambous.html#/33-rouleau-050m_x_25m. Even at 1mm thick it could be fairly readily creased and pleated to keep a slight lean, and still go around corners. 69.49€ delivered.

Barrière anti racine ECO 1mm spéciale bambous
Référence : JAR_BA_50_10_25_R
Polyéthylène Haute Densité (PEHD), noir, 100% recyclable, densité 940 g/m², épaisseur 1 mm
Got 16m of barrier and had some spare. Angled slightly, and back filled just as a storm started.
Found the 10cm outlet pipe from the fosse at 45cm deep on the uphill side. The join is about 20cm to the right of the pipe. Didn't find the pipe at the other side.

31/3/24 removed 10 shoots outside the barrier ditch side. 3 good size ones inside.
4/4/24 removed 35 in last 2 days. A lot inside the barrier
5/4 54 removed. 2 out of reach.
14/4 Kind of got bored of picking shoots, so spent an hour or so over the last week digging out the remaining clumps.  I got lucky with a few into the ditch that were thin. I now have a very impressive pile of rhizomes drying in the sum before I knock off the soil and return it to the increasingly holy area around the bamboo. Today I dug some more out that sprouted including a stealth one that had mad it half way to the road.
23/4 found another 2 stragglers today. They grew 15cm overnight. Not particularly long and had been cut off from the mother originally. New growth inside seems vigorous and has in some places exceeded the existing height of approx 1,5m. 1.5m at the rear, ~2m at the front was chosen last year as easier to maintain and get the bramble out.

Bamboo was beyond the 3 rocks

Ditch to the left. This was all bamboo.
Plenty of new growth

Plenty of new growth

Growth to the left was the rock and down the slope on the right


Research sites

https://bambouenfrance.fr/racines-bambou/ table showing root depth (to ~40cm but phyllostachys bissetii  not mentioned)

https://lewisbamboo.com/pages/controlling-bamboo trench to 45cm generic bamboo

https://www.gardenersguild.com/5-things-to-know-about-the-bamboo-plant
tough horizontal bit is rhizome. Thin bits are roots.
Like the roots of other non-rhizomatous plants, these are the soft, white, fibrous tendrils that creep down into the dirt. In bamboo, the roots tend to emerge from the nodes of the rhizomes. While the rhizomes spread out and generate the growths that will become new shoots and culms, the delicate roots mainly grow downward and are responsible for drawing water and precious nutrients out of the soil.
https://bambubatu.com/bamboo-anatomy-9-parts-of-the-bamboo-plant/

https://www.houzz.com/discussions/1735570/phyllostachys-bissetii-clumping-or-runner
'Most definitely, positively, NOT a clumping species. '
no need to remove rhizomes - they die.

Sunday 4 February 2024

Hedge

 Cut the neighbour's hedge near the log pile and the bamboo 

Monday 20 November 2023

The utility room

 And so it begins..

24/1 Cleared a bit more garage, worked out levels and soil pipe. From the internal wall, the slab is highest along the adjoining wall, so had to removed some floor, and trimmed 2; 1 10mm, one 4mm. The floor then sloped and lost 40mm nearest the car door, vs 25mm opposite the internal wall.

25/1 Cut joists, fitted hangers, cut insulation. Extra support under joists nearest internal partitions, and 1 under trimmed joist (-10mm, but calcs still ok) which sits under the washing machine.

26/1/21 Secured base to garage floor, fixed 2 hangers in the wrong place, fitted deck. Filled gap between house and utility (3 hours!) Ran conduit for new supply. W/m mains cut into deck ready for partition. 

27/1. Rafters are not parallel to house wall. Put up outside partition rail + some uprights. Wired the earth in. More screws required! Ordered workstops + cabinets.

28/1 finished base of internal skin. Put up 2 boards of external skin. Removed existing sockets off wall and put 3 new on 2 boards. Moved tools and put up a small bench.

29/1 pm doubled up 2 joints on osb. put up ceiling rails + some spans

30/1 corrected ceiling rail on outer skin - 13mm too low. 2 ceiling sheets. Internal PB rails and 1 sheet. Dis board, temp feed + 1 light.

31/1 finshed osb top/bottom rail, ceiling rail, ceiling spans. Cut all metal uprights, but several left unconnected to the ceiling to allow PB to be carried in and twisted easily. Ceiling FG + 2 walls (mistake - should have done this yesterday, but didnt want to get covered in FG) Run out of base rail.

2/1 --

2/2 loft tidy, fit remaining ceiling plasterboard. Ran in most conduits, pulled supply cables. Chased in sockets and fished between. 

3/2 move garage light switches  temporarily,  install outside water  pipe.  Clean wall, glue plasterboard (all afternoon for 3 sheets - use low expansion foam next time. About 9L of glue per board comes from 15kg + 9L water ie 15kg for 6m2.  Too much. Tried 4.5kg + 2L for 2m2 and still too much. Mix up pretty thick)

4/2 install sockets in glued plasterboard, build loo temporarily and set up waste.  Screwed down floor + finish floor around waste.

5/2 Cut light holes. Fitted rails for internal skin.

6/2 moved garage light switch from utility to garage with temporary extensions. Added permanent live to garage light and put in a socket. Put door opener back onto original trafo. Framework for lobby and temporary plasterboard. 1 sheet of plasterboard and osb plus insulation. Drilled hole and fed conduit for shed. Final piece of ceiling plasterboard fitted. Removed trailer wheel, tidied and moved all 12mm osb to be fully upright by screwing it to the last sheet. Most had developed a bowed middle. Moved remaining 7 sheets of plasterboard into the utility. Worked out where utility door will go.

7/2 --

8/2 fitted utility door and main door, boxed out frame, light switches.

9/2 Finished utility door. Fitted loo frame/door. Misc bits. Tidy. 

10/2 pulled all remaining wiring. Lights in. Looked at window location. pm --

 15 working days to date.

11/2 cut & glued plasterboard around arch. Cut frame for window. Cut a sheet of osb3 to finish run to door and wall above bench. Tested quick setting joint filler, about 8 years old and it was fine! Taped and jointed wall side of utility. 

12/2  pm stitch drilled for support below lintel. 26mm board, 760 long. Mortered in with fresh cement. 

13/2 Fished congealed lighting. Wood for worktop, wood for hooks, fire extinguisher. Finished hook wall (needs insulation) Finished pillar/ reveals. plumbed outside tap. Sealed gaps between slab and floor - removed plot and replaced with wood to allow better draught seal.

14/2 -

15 cut window opening, block hole, render up sides to fill gaps and tidy (red dust everywhere) 

16 make sides for window to make thickness to 150mm- oops should have been 163mm. Fit support on window underside.  Fit window. Test 11yo bag of Weber render by putting a scratch coat on the top reveal to fill in the large gaps.

17 1/2 day. tidy, fit sill, fit window. Bit of a devil as the frame twists, so catches on opening

18 2 layers of silicone around window inside. Framed and insulated. Worked out where basin will go.

19 pm install loo

20 am plumbing for basin

22.5 days to date

21-

22-

23 dummy install of pan. Seems frame is twisted and can't get pan level. Moved cooker and pulled back 15mm outside tap feed and rerouted it into utility.  Added 16mm per to hot. No joins. Fitted manifolds,  connected outside tap and loo. Tried drilling a hole through the bricks near the loo with the intention of leaving a threaded rod for future pan retention if plugs fail, but can't reach by about 100mm. 

24 1/2 day. Manifolds now live. Leak on soldered joint on outside tap,  but now considering moving tap to inside shed. Plumbed basin.

25 changed plugs at top of loo bracket to those provided. Much more solid than 100mm hammer in. Moved outside tap to shed. Glued most of sink waste. Fitted plasterboard around window and installed sink.

26 <1/2 day. Installed window grill, glued soil pipe. Replaced loo top wall plugs. 

The bricks have the first web at 40mm, so can use plugs of around 60mm ok. If they have anti rotation tags on the head, file a flat for them. 100mm hammer in dont work. 80 generally OK.

27 test soil pipes. Reinstall loo partition. Install light switch.  Chop 10mm off manifold brackets else worktop of 40mm may not fit. Metal for cistern partition. Hole for 32mm waste.

26.5 days

28-

1/3 glued floor joints from top. Screw down lobby to kitchen bit of floor. Cut plasterboard + glued. Finished all partitions and loo openings.

2/3 prep for first joint + joint.

3/3 am 3h. Scrape back ready for top coat. Pm 2h 2nd coat ex corners + 3 corners 4h.

4/3 am scrape back, sand, caulk and size.

5/3 pm paint

6/3 am tile prep, lights

7/3 tile, lino prep, sockets, DB wired to main.

8/3 lino,  cupboards,  threshold strips, skirting behind base units 

9 cut hole for tap, reinforce sink, fit sink and base. Plumb sinks.

35 days.

10-

11 6h. fit towel rail and temp 120cm wooden. remove cooker. test fit new worktops 

12 fitted worktops. Colorfil and wood glue one side, well clear of each other. No space for biscuits. Scraped back and filled joint again. Filled white top of edging strip with limited success. 

13 removed socket, moved oven socket, moved ignition socket. Screwed tops down. hobs. Edges sealed with white silicone thattook ages to go off. 

14 fit oven and hob sealed with silicone, splash back, glass door, extend gas as it hit oven rear!

15 fit sink edges and sink itself sealed with silicone.

39.5 days

16--

17 tile kitchen.  1 hour. Tiles on floor all loose.

18 grout 1h

19 silicone + caulk. Temp fit utility worktop 3h

20-

21 2h Painted 1 coat linseed both sides of osb floor. Cleared shed base and added hardcore and weed matting

22 pm floor and 1 wall

23 shed south and west walls.

24 shed North Wall and finishing West

25 finish west roof and roof. Sealed ends of cut wood and fitted external angle. Plumbed. 

26 pm wiring, make door.

27 fit door, shelves, shift stuff

28/4 - 31/4 -

1/5 fit loo + basin am

10/23 Bought Ikea doors as coated chip has shot up in price. Fitted all cupboard doors.

18/11/23 Finally changed the HW 22mm pipe to ensuite for 15mm in loft last month. Today swapped all the bitty plumbing from cylinder to main connections for 16mm PER. The HW JG pipe was creased on a formed corner.

To-do 

caulk house

Oil shed door

Air slot for induction hob 

Seal bathroom sink


Saturday 14 October 2023

Diesel garage heater

There are a bunch of these heaters sold under lots and lots of names.

This one in for repair is a Kende spark 30, 28kW, on wheels

There was a small fire that ruined the wiring and destroyed the photocell (LDR) Parts are readily available in the USA, but not in Europe at anything approaching a fair price. The PCB got toasted when the wiring shorted to chassis. The PCB is live chassis. There is just an on switch.

Very simple operation. The fan and ignitor run all the time via a triac. If no flickering is detected by the LDR (either the flame or ignitor) it shuts down in 2 seconds. To reset unplug for 10s.

The LDR choice doesn't seem critical so long as its change off resistance is enough keep the schmitt NAND from triggering. See the circuit for some figures.


Monday 4 September 2023

Grain mill

 Not a part 2 of the home made grain mill, but a how-to-use-a-bought-one

The wooden one I blogged about just wasn't able to crush the grain.


A cardboard chute to funnel the grain. A large socket on the wing nut instead of the handle.

About 30 mins for 8kg.