Saturday 10 December 2022

A new power project

If you're after a piece of gear that is reasonably expensive, and you see a lightly fire damaged one on Ebay, keep searching. Or allow plenty of time.

We want to be more grid independent, so was looking at power wall solutions. The biggest players such as SMA and Studer not only want stupid money, but if you want to see a some pretty graphs you have to use their gear $$$$$. Enter Victron and the Multiplus II


A good range of voltages and powers. In 2022 a 3kVA/48V or 24V version can be found for 1200€. Having spent 260€, I got this


Yep, I saved ~1000€ and gained a claimed working inverter. And a fair amount of work, but that's part of the fun, right?


Before
Before 
After

See the melted wires and connectors?
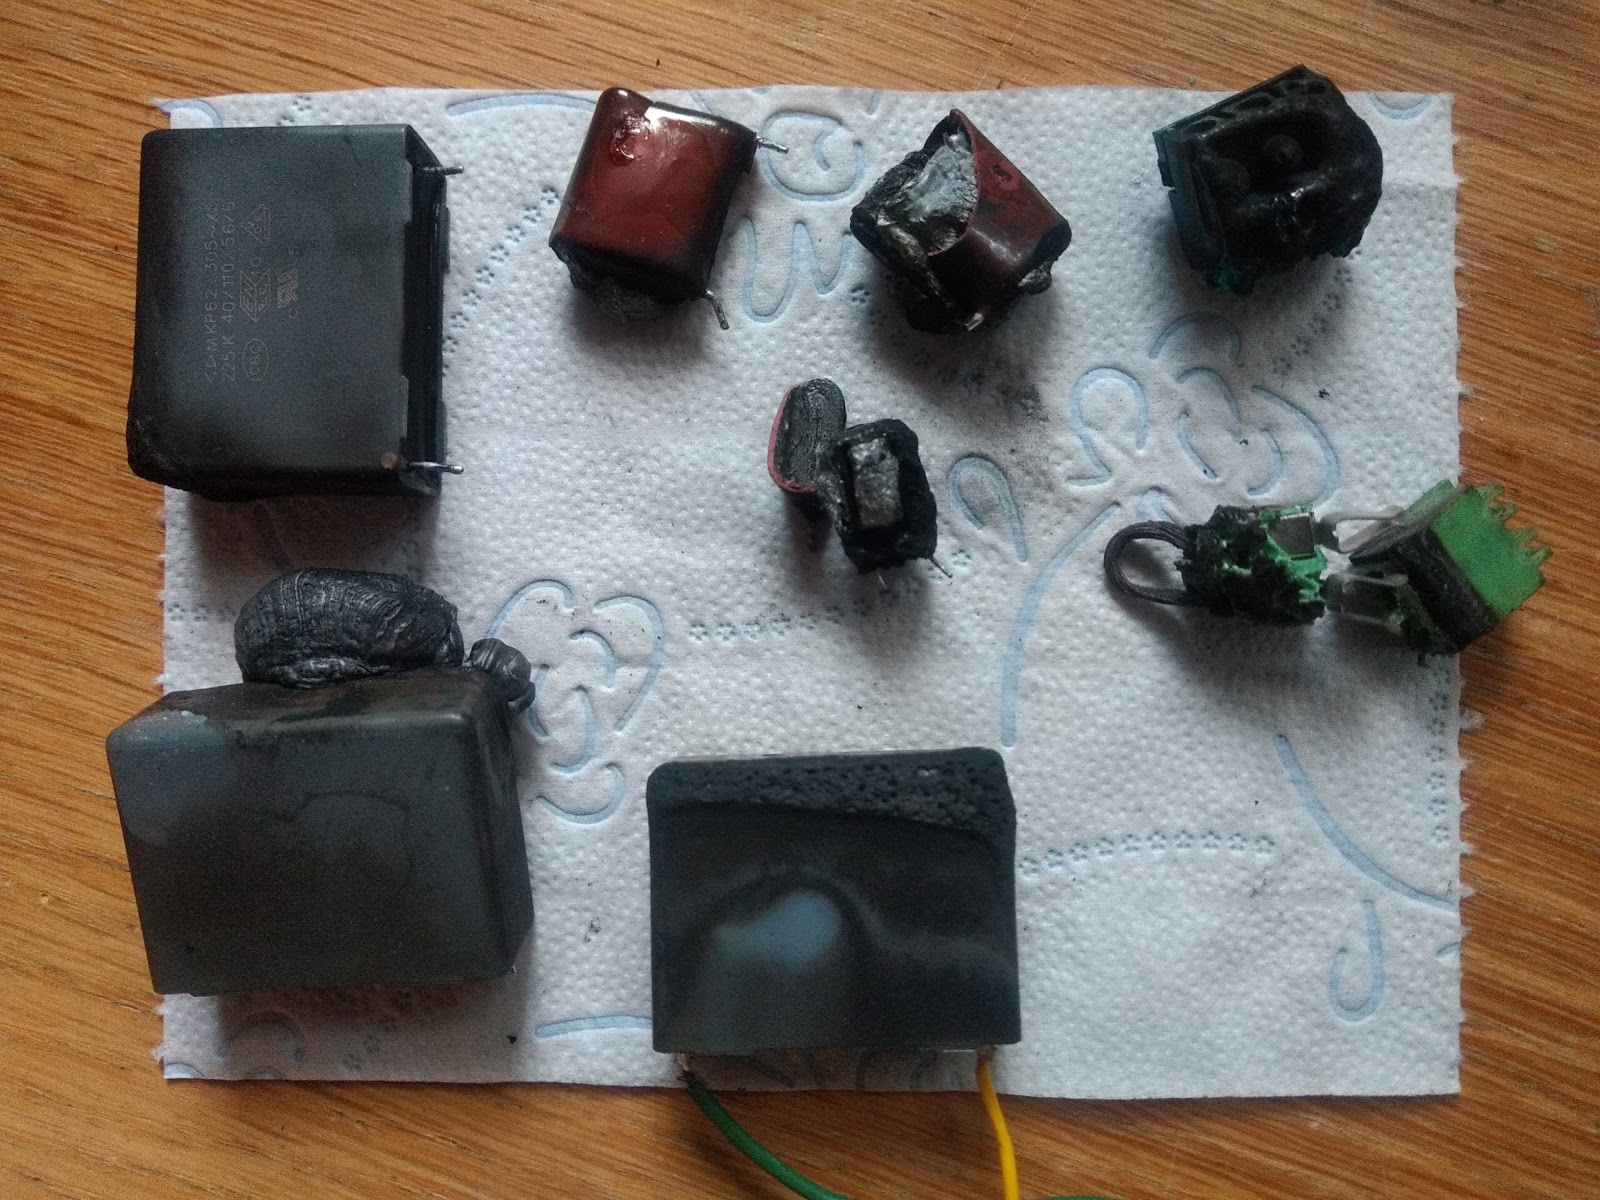
There is also a fan (blades melted) , a support PCB and trafo. The trafo just wiped clean.

Cleaning was pretty basic. A tap water rinse with plenty of directed jets. Then to displace the water 99% ethanol in a sprayer and a child's toothbrush, plus other small brushes. 
You'll read plenty on line saying soot is magnetic, but none of this soot was. The nylon bristles on the a toothbrush are ethanol safe, but the handle may melt. ESD precautions were followed; no vacuuming, and no compressed air. A wet nylon brush is OK.

 A (lithium) battery fire that caught the OSB on fire. Note the power available light.  The owner confirmed it was still working after the fire. I suspect that the wiring was too small as the 10mm battery tails were still connected. 50mm recommended.


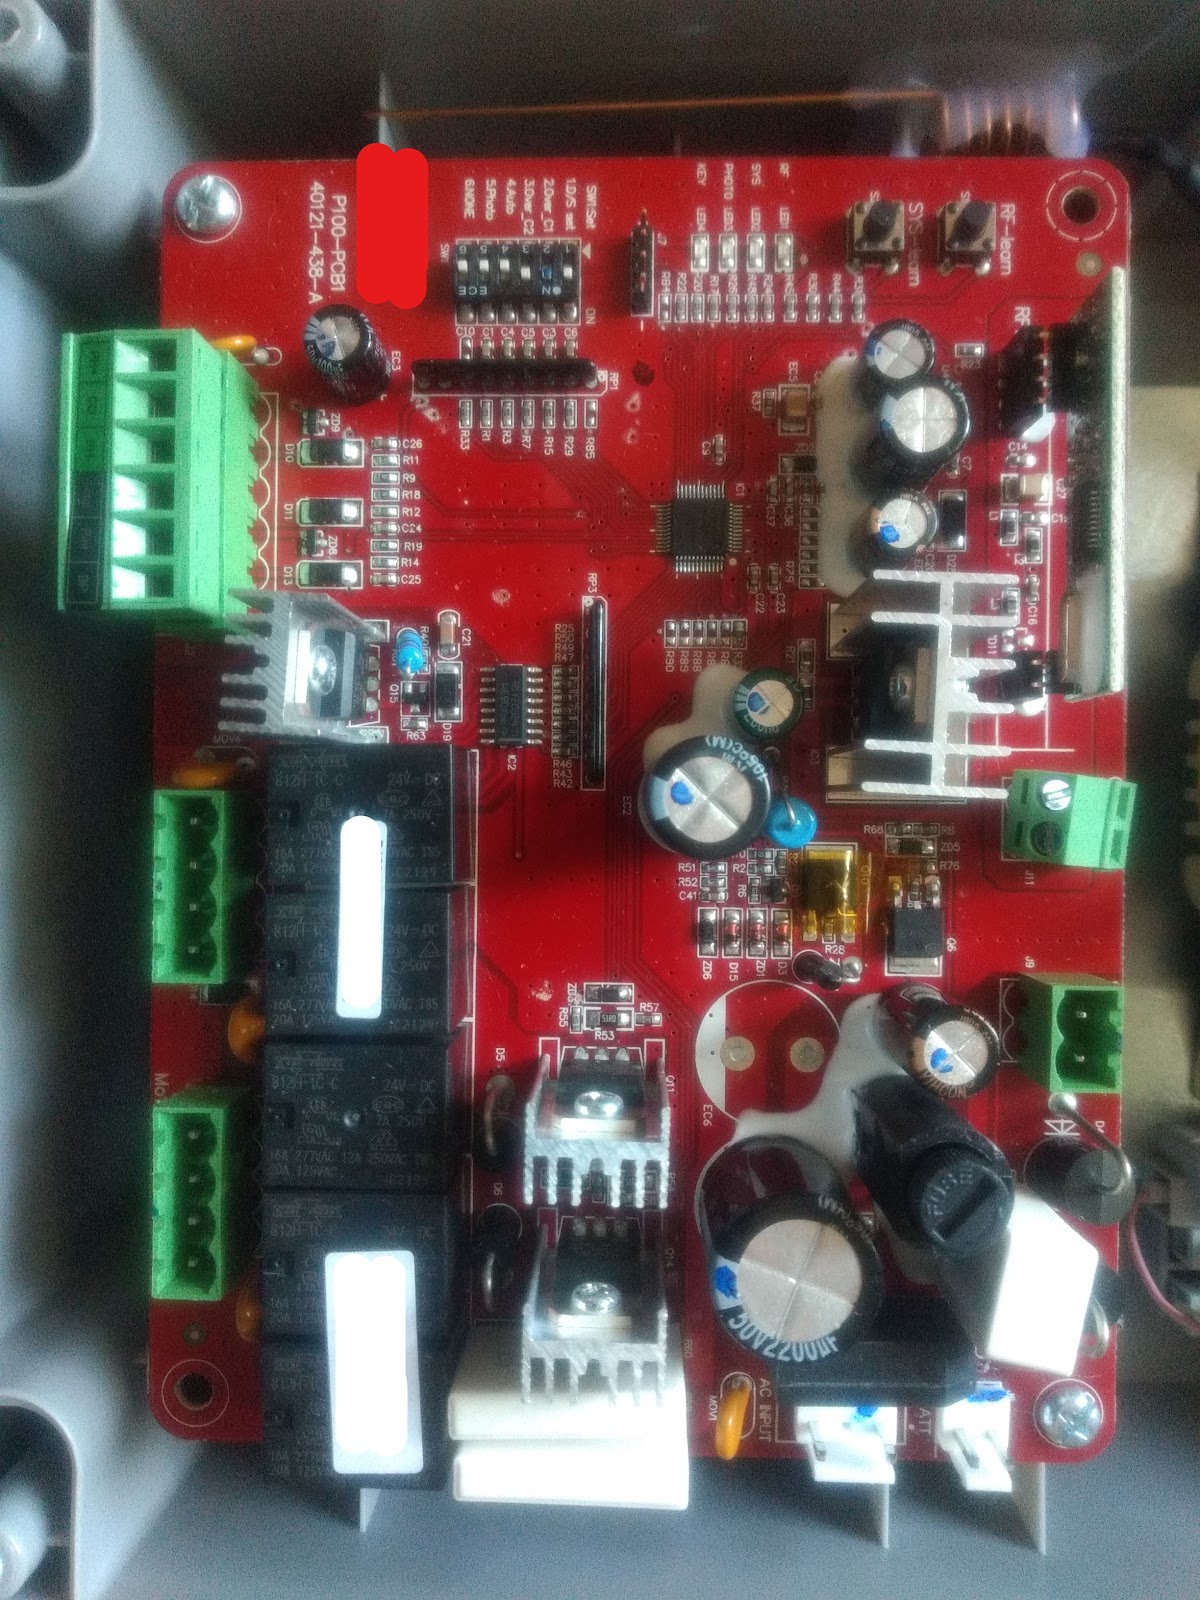
 A load of stuff to replace, the worst of which is the main power terminals. These terminal are designed to take 70A at 230V. Imagine the size of pcb track and the amount of heat to melt the solder.

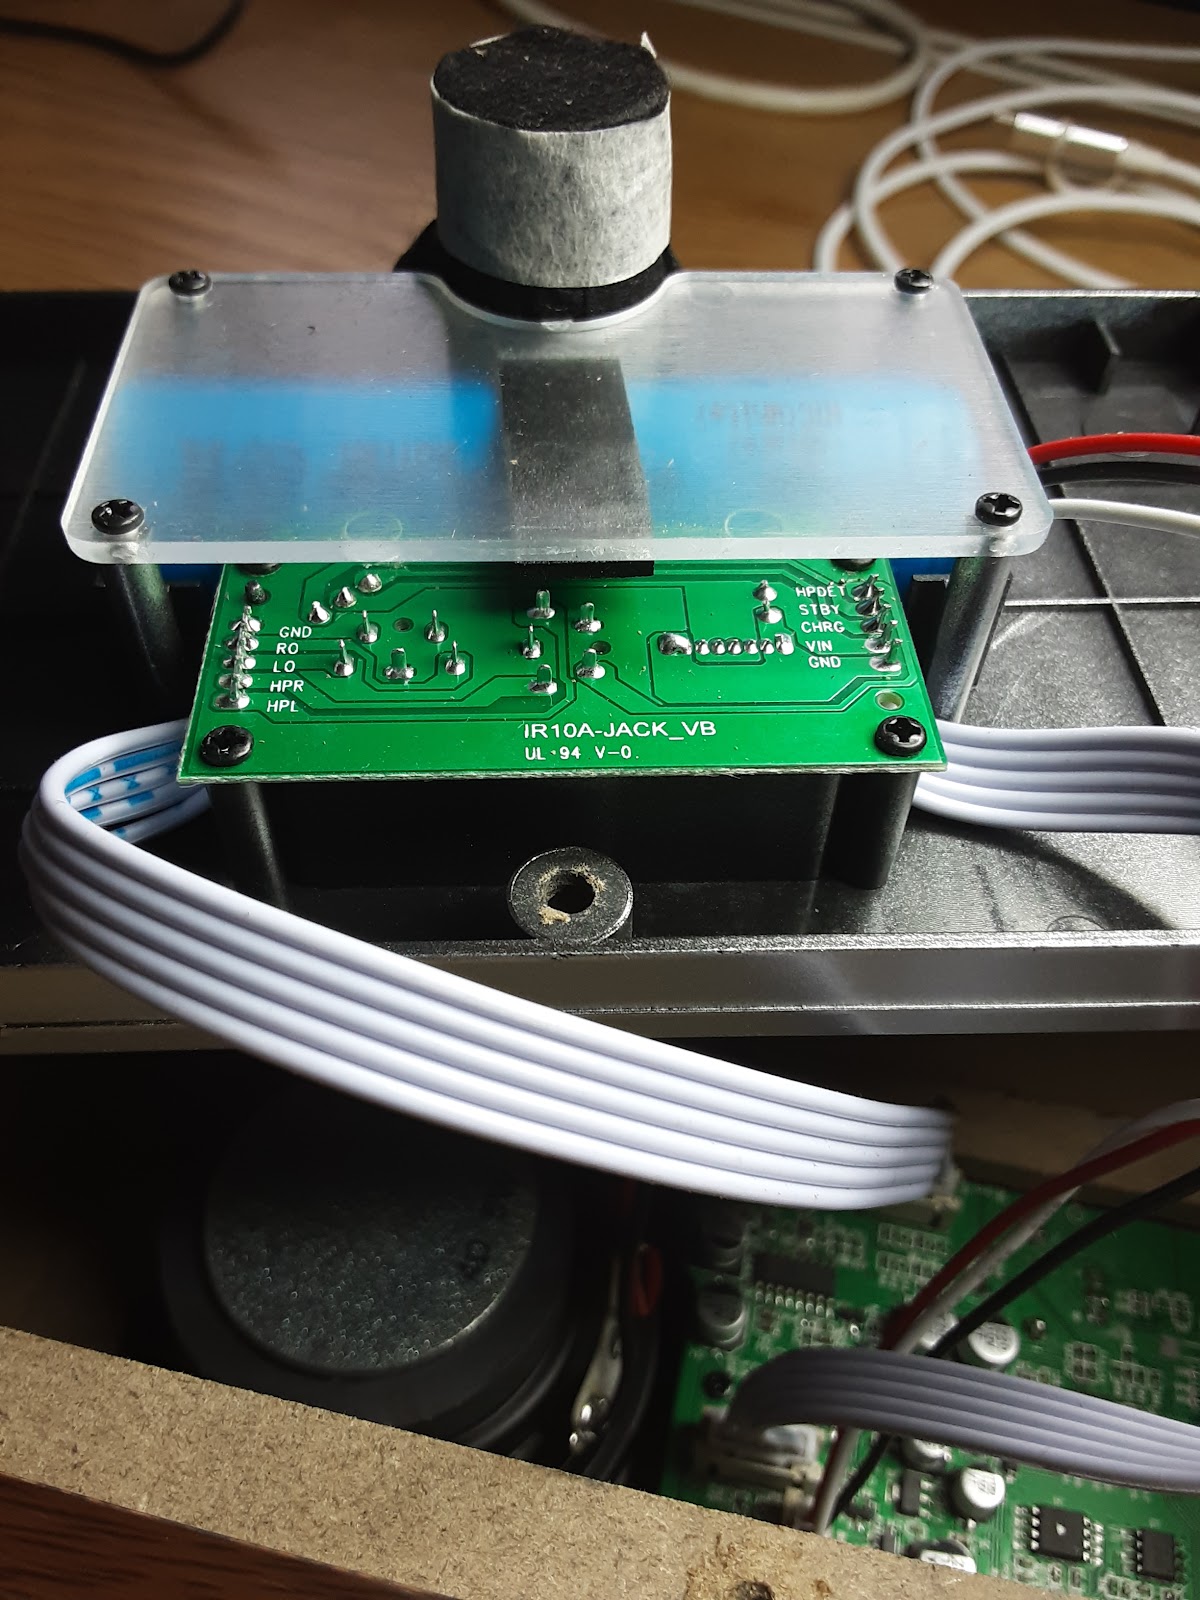
This product is repairable with large soldering irons and experience. There are 5 PCBs; a SMPS; a logic board; logic board daughter module; 2 mosfet gate drivers.

The day after cleaning, with the PCB stored at room temperature, I powered it up. It worked fine with all of the suppression caps missing and a melted fuse left it. And not earthed. 

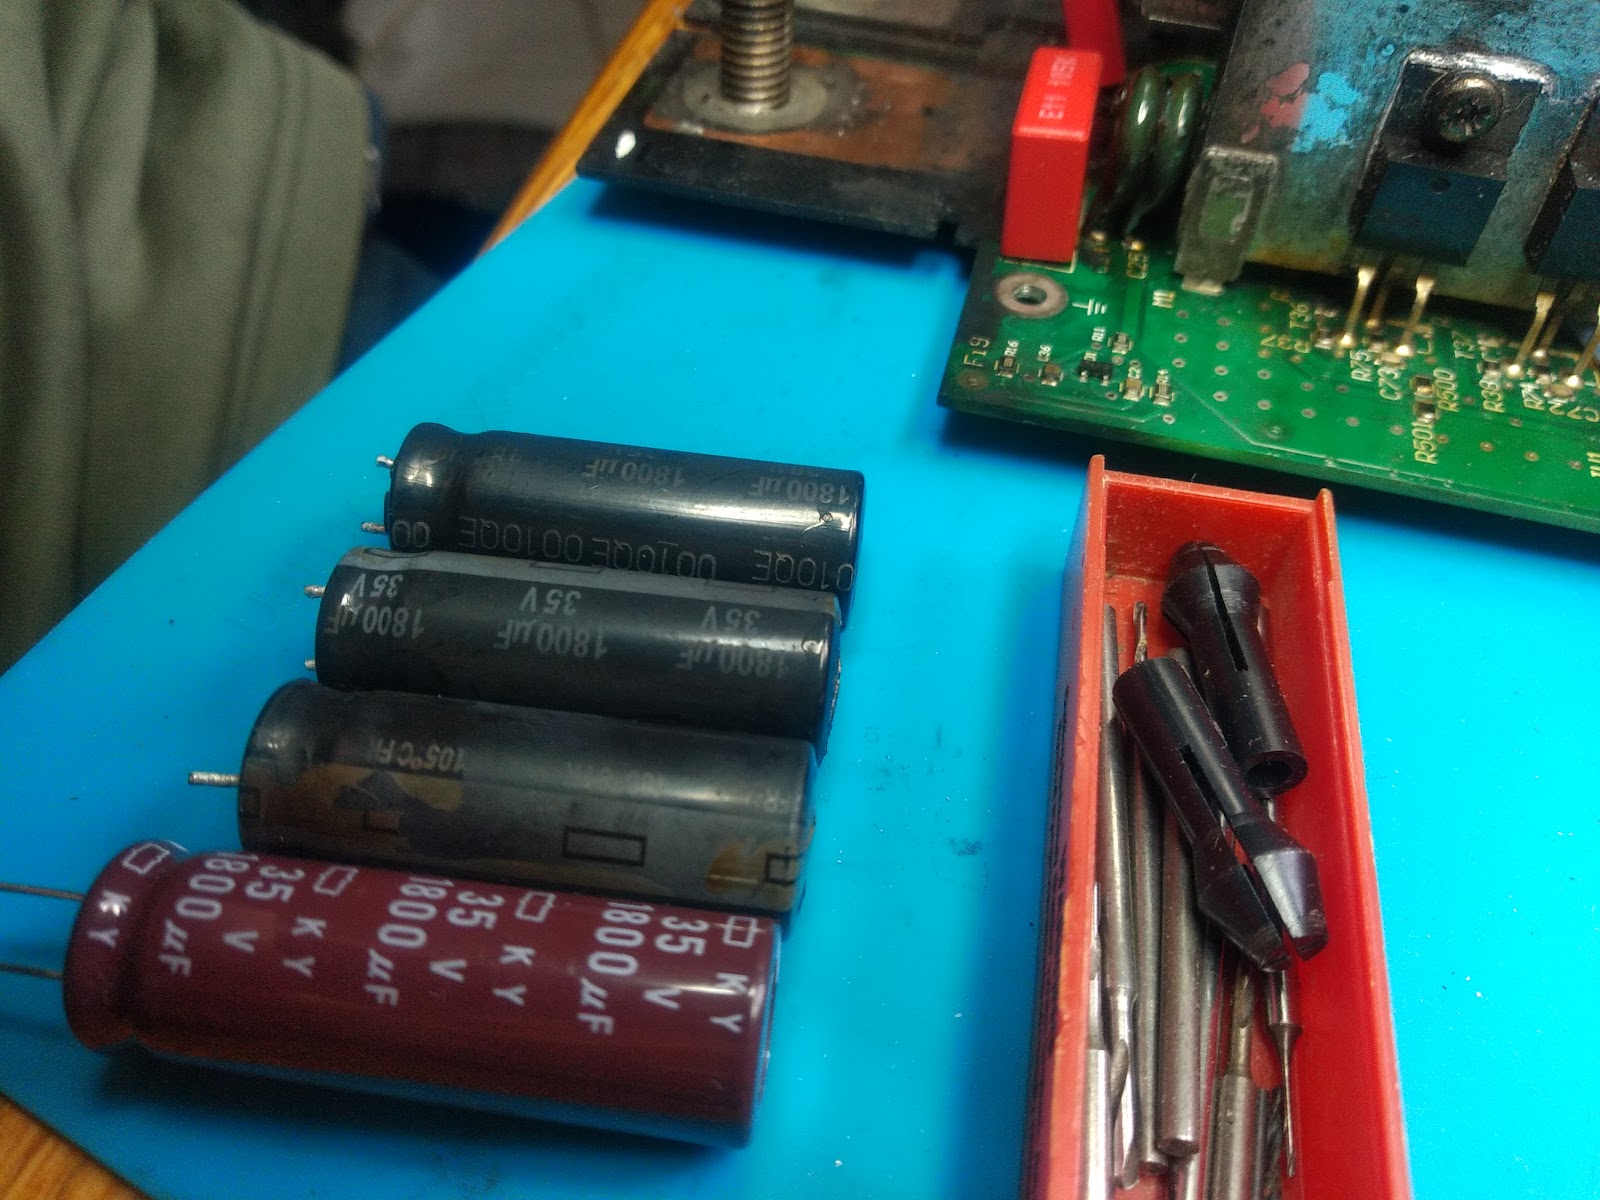
28/2/23 Finally ordered the spares from Mouser and replaced anything dodgy. The hardest part was removing and soldering back the parts. The PCB is likely 4oz copper and whilst it has lands, it took a large soldering iron bit and a 50W iron.


The new cap at the front was slightly taller. You can't really see, but the 3 at the rear were slightly bulging. The worst had gained 1.6ohms of ESR and lost 10% capacitance. The others seemed ok. All replaced along with the 3 red ones on the PCB. 3 X caps were changed. 2 charred relays work fine. The terminals are fine, just ugly. They are around 40€ to replace with Wurth, but still 10€ from no-name. I decided that there was little point as they were not going to get out the PCB easily, and I didn't want to grind/cut them out.

The fan was replaced with a similar flow unit (Noctua NF-F12 iPPC-24V-3000 Q100 IP67 PWM), but controlled with a pic using Intel PWM commands to the fan. There are a lot of posts in the Victron community with one dealer swapping out the fan before delivery with a quieter one with half the flow. The MP commands the fan to 40% on with only 1kW load in a room at 20C. It doesn't stay on long, but I think half flow is too marginal. It's a 20mm unit vs the original 30mm. It's held on with special anti vibration mounts at the bottom and a bit of wire at the top. Moving air makes noise; there is little vibration from this fan.


Sunday 30 October 2022

HTU21D

The weather station is eating HTU21D humidity sensors. About 3-4 / year.

I'm beginning to think the sensors from Aliexpress aren't genuine

The temperature still works, but humidity stays at 0%

I wouldn't mind if I lived in the tropics and they were permanently wet, but the one that just failed hasn't seen proper rain for months.

Ive started covering them in PTFE tape which protected a genuine SHT for around 10 years.


Replacements

1/3/22 ? PTFE tape, otherwise open. A fair amount of verdi grĂ©e on the pins + pcb

30/10/22 sealed in acetic based clear silicone and PTFE tape

Sunday 25 September 2022

Fencing the garden

Cut the east hedge and installed 1m fence to keep the deer out. A couple of days, plus the shredding. A further afternoon for the south hedge, and 16/11 an afternoon cutting most of the north hedge.

Tuesday 13 September 2022

Denver radio IR-135S

 A few internal shots. Nicely built.

The battery is a single 2000mAh 3.7V cell. 3 wires, the white marked NTC.

The USB consumption in standby/charging battery was ~0.6A. Turning the radio on increased consumption between 0.1 and 0.15A, meaning a battery life of around 9.5 hours.


Rear panel with led, usb & 2x 3.5mm jacks


Friday 19 August 2022

Dishwasher energy saving?

We basically have free hot water as surplus PV is diverted to a 65l tank. I noticed in the manual for the dishwasher that it can take cold water up to 30C. I had an old shower mixer, so I've shoe horned that into the cold and hot feeds under the sink. Early results show a 25% energy saving - the heating element is normally on 12 mins, and it's on 8 mins.

Before I start planning a cruise with the saved money, it's worth noting that it's 25% of the water heating phase. Why? Because the PV pays for the the period where the pump runs. Our modest PV will never cover the 2kW of the heater. Hover, this is the dominant cost of a dishwasher for most people. Today we are generating say 1kW. The DW heater plus other loads total around 2.1kW, so for a 12 minute period we pay for 1.1kW, or 220Wh. This happens twice for a 'run' so 440Wh. With hot water feed, the heater runs for 8 mins, so the 440W becomes 330Wh. Over a year assuming we run it every day and it's a sunny day that's 40kWh, or around 8€  saved! 

There are days when we have little or no PV, but still have hot water from the day before. In that case the savings, assuming 300W PV, on say 1.8kW are 360Wh x 2 = 720Wh * 0.25 * 365 = 66Wh / 13€

I'm not convinced the savings even paid for the PTFE tape and certainly not the 2 hours or so I spent, but it all helps. I'm still trying to find a way to offset the router which takes 20W 24/7 (35€) and push it into the daytime. It takes quite a big battery to run it from say 8pm to 8am. 

Some dishwashers, in particular Bosch and Smeg, can take cold water up to 60C which would almost double the savings.

~jan 2023. PSU failed. Threw in an old usb adapter.

12/11/23 Looks like the inlet valve is passing. Came to use the DW and found it had so much water in it, it flowed out when I opened the door. This tripped the flood alarm so I had to take it apart to dry it out. I have noticed increasingly that there is water in there and assumed that it wasnt pumping out correctly.


Sunday 7 August 2022

Lidl silvercrest induction hob SDI3500

Got a Lidl single ring induction hob.  Works well. However, about a year into the 3 year warranty it just stopped mid-use. Nothing. Rien. A fuse? Well yes, but not the obvious fuse near the inlet.

There is a thermal fuse built into a rubber piece which is in contact with the cooking top. It's easy to test. Pull the red connector and if there is no continuity, replace the thermal fuse. You can  short out the pcb connector and do a check that there is no other problem, but never run the appliance with safety items missing,

Bought a similar replacement Sefuse sk167R0. The thermal grease had all dried out and might have contributed to the over-heat triggering.

BTW the green connector is a 100k NTC thermistor.

I found this which has some photos and some other easy to fix problems.

https://www.academie.repaircafeparis.fr/index.php/la-cuisine/plaques-de-cuisson/plaques-induction

Tuesday 26 July 2022

SCS1 one gate


Update 26/3/23. I won't be buying another SCS system. They are poorly designed, have no free support and have almost no adjustments. Even if support is free you can't change much. They are cheap for a reason. See the update towards the end for the latest damage caused by the system and the remedial action taken.

And now a rant about problems during an install of SCS1 one gate 27/7/22. The system it replaces has always had a dodgy motor and recently it would open and then automatically close; this is probably excessive motor current. However a new motor is around 100€ and a new system 121€. Looks like companies like to support land-fill and new sales.

I installed a 12V pro version around  9 years ago and my main complaint then is pretty much the same now. SCS buy cheap mains transformers. So cheap that the copper loss on them costs you money. Back in 2013 I reported a staggering 9W loss on a 100VA toroid.  That is truly impressive as toroids are normally very low loss. 

The trafo in the new unit is made by the world renown 'just for you enterprise' and it improves losses slightly, compared to the toroid, with only 7.5W of loss for a 80VA unit. To put this into context at 2013 prices, the waste on the original unit is 9€/year, so 81€ through life.  At 2022 prices it's closer to the price I've just paid for the replacement system (121€)

As I reported in 2013, I fitted a small mobile charger to keep the electronics working which uses 1W. This wasn't quite possible with the new system as they've installed a low voltage dropout for the battery. It's set to 24V which is way too high. You'd normally cut off at 1.75/cell = 10.5V, or 21V. However, an old 18V DC wall wart did the trick plugged into the PV connector. Once the gates try to open, a trigger on the flashing beacon turns on the original transformer. So no changes to the pcb, so warranty intact. For info the main trafo puts out 28V, giving a FWB output of nearly 40VDC. When both motors are running this drops to 32VDC.


Incidentally if you do fit a battery, just check how the charger works. I measured 40V at the battery terminals for a 24V battery (no battery), but it's fed through a FET Q6, and there is a voltage feed to the processor, so hopefully they will PWM the supply. I'm not interested in replacing lead every few years for a possible annual use, but YMMV.

Depending on whether you think it's worth the effort, some maths.  I have 3 of these poorly designed products. 2 for garage doors and 1 for gates. They would waste around 30€ of leccy per year, or 185kWh. If every home in France wastes the same, that's 3700MWh, or 1 large nuclear plant. 

The new system doesn't show gates closed, so I'm using a reed switch and a magnet to easily show this. I've also added a photocell beam which will double up as a door bell if anyone goes through the beam when the gates are open.

The beacon I have (no new one) uses a 12V bulb. I couldn't find another bulb to put in series, so robbed the 96V/76mA led panel out of an old broken light 7W and I run 4 LEDs in series off a constant current (LM317 app note) of 20mA to give a 12W equivalent light

The picture shows the LEDs in a SES base. It turned out the bulb holder was too tall, so I used choc block in the end, with the original diffuser balanced on top of the LEDs


The motors/arms have plastic parts, so we'll see how that works out. The motor is underneath and you can just see the metal worm drive on the left.


I didn't analyse the remotes too much, but they are Keeloq (HCS301) and use rotating codes.  SCS have helpfully changed the manufacturer's code, so any remotes from the old system (also HCS301) are now bin fodder. Really well done SCS. Nothing like re-use in your book.

Bent trafo on delivery 


The mains fuse block is incorrectly installed and badly stresses the trafo connections when the fuse is inserted/removed. Oddly, the manual has a photo of the correctly oriented installation of the holder, but the manual drawing is incorrect. Go figure.

And why do you suppose that the motors slow down at end of travel, but not when starting, so the motors, gates, mounting, etc are all given a good yank.... I knew I should have just designed my own.

My favourite fuck up by far is the wiring for the internal aerial. Whilst they have done a lovely job (really) of making a good internal one, if you replace it with an external one be really really careful. The screw terminals for the aerial are just behind a heatsink with +14V, so you have every chance of grounding the 14V rail. You will most likely destroy the regulator. Turn off at the mains and open the gates to discharge everything.

26/3/23. A sorry state of affairs. I have outward opening lightweight gates. The outward opening isn't really much different, and this will stress mounts slightly more due to the angles between the various components. However, the poor design of the product exacerbates any issues.
For example, the power supply for the 24V gate motors comes from a simple trafo that gives 32V DC when both are running, and around 36V for one. This means that the motors draw less current (whilst being damaged on over-volts) and the current sensing works less well. You have a choice of 2,3,4 or 5A. If I select 2A it's ok in the summer and wont open in the winter. Easy fixed if they bothered to install a temperature sensor. A 24V supply would help too. But even then, the current sensing is so bad at 2A that it rips the motor fixing out of a concrete pillar. The manual shows plastic rawl plugs. LOL. I used 10cm M10 rod and chemical anchors. Lasted about 2 weeks. I've used exactly the same fixings on a 1.4m satellite dish and that's not moved in some very strong wind.
I've just put a welded steel band around the pillar using 6mm plate, and it's managed to bend that.  I can just about bend this steel it in the vice. A really very poorly designed system.


I've managed to prevent this damage at fully open by moving the bracket on the gate to just beyond maximum piston extension, so the gearbox locks itself. However the shutting force is similar, so I'll have to weld some angle iron in place. I guess I'll be reporting gearbox failure in a few weeks.....

The other side is even worse. I'd put a bolt through the pillar to hold the motor bracket in place, but the continual excessive force made the bolt hole oval and a large piece of concrete has been ripped out. The control box was on this concrete but luckily I spotted it in time and thus saved replacing a 30€ plastic box (and land-filling the broken one). I'll make a similar bracket and retaining the through bolt to stop the bending.

I'm actually half hoping that I hit and damage these motors so I can justify chucking them.
The replacement from a decent company that has proper force control and/or end stops will cost 500€+  and will install in a few hours. And I'll never need to look at them again. I know this because I look after another house that has a well designed system, from a company that doesn't sell items ready for landfill. Flawless.

I really really hate shit design. It doesn't take much more effort to produce something good and long lasting. There are plenty of complaints on-line, but companies will never read posts whilst continuing to claim that they have almost no complaints. Been there, had the argument. Why would they go looking for trouble in 'unverified' posts?

The metal bending in the picture above got worse, so I ended up putting a bolt through the band. It's been 3 months and nothing has broken...


Sunday 3 July 2022

Oil filter removal

Today should have been a simple oil change on 2 bikes. Both maintained by Yamaha. Both had drain plugs so tight I needed a 45cm bar to loosen them (45Nm to tighten, normally) Both had oil filter so tight I used a 45cm pipe wrench not only to start it, but for the first complete turn ffs. Sadly one bike couldn't accommodate the wrench, so I had to resort to YouTube. No luck there,  just lots of people suggesting putting a screwdriver through.  I know that doesn't work as I tried it 30 years ago. The screwdriver just rips a large slot.

I have a chain wrench with a handle, but the teeth just went straight through the side. I tried a bit of wood to spread the load, but then it wouldn't grip. I was going to try a piece of rubber when I thought about a rubber strap wrench. Wetting it gave grip, but not enough. 

The final solution came from a post were someone suggested a piece of sand paper under the band of a strap wrench.  I don't have a strap wrench,  but I've got jubilee clips. With that assembled, I could get the 45cm pipe wrench on the bit that sticks up and off it came. As it was also on stupid tight I had to keep moving the strap back for a full 2 turns, then I could just loosen it by hand.

I also sprayed some WD40 around the seal and left it 15 mins, but I'm not convinced it made any difference. 

I'm picking up a strap wrench this week!

Friday 17 June 2022

PV panel clean

It's at least 37C in the shade, so the perfect time to clean the PV with a watering can and pole.  I clambered up there as it's a shallow pitch.

I'd held off cleaning them as a bit of dust will reduce generation and thus lessen the amount of power I burn off (not allowed to give my surplus away) However, when running the air con, power is king!

1630 CET The southern array output rose by nearly 10%. The eastern array 8%, but it's starting to lose the sun.

If you do clean your panels whilst on the roof be aware that if you wet the tiles they may become slippery, particularly on the east/north faces.

Tuesday 31 May 2022

Garage Extension


It's started.
Existing garage 5.28 x 5 = 26.7m2, but lost 8m2 to utility
Extension 2.68 x 4.6m = 12m2

5/7/21 Emptying and tidying 1 day.

Empty the wood shed
6/7 1h digging 5 barrows

7/7 1.5 hours. 5 barrows. Just under half of the old shed.

16/7 2-300L taken to tip. Less than 1/4 left of base.

21/7 dug out bank. Trailer full. Removed some of the stones at old shed entrance. Got a good pile of earth stored on slope.


22/7 2-300L taken to tip.

26/7 dug out the rest of the bank, left ready to go into trailer 4h

27/7 5h. took down old shed. Moved path over to near new location. Dug out old path base - 5 barrows of stone in pile.


Move the path temporarily

Shed gone

Protection from the rain!
29/7 3 hours to mark wall foundations and fill the car + trailer.

5/8/21 2 hours unload sand, gravel etc, 2 hours fill car + trailer
6/8 moved 2m3 of ballast and gravel ~ 2 hours
8/8 4h dug out the long wall foundations to depth (0.55 ish) Trailer filled
9/8 4h dug out rear + door foundations
12/8 laid foundations 6h including clear up. Mixer wont do a 100L mix. 13 mixes / 6.5 bags cement. 32C. Stuff laid at 11am had gone off by 4pm.
110L melange + 35kg bag cement = 100L concrete
13/8 car full of clay to the tip.
16/8 4h. 1st row main wall. 1/2 bag (11.5L) cement.  moved 24 shovels in 4 barrows = 300L. hmmm
17/8 rain am. 4h 2nd row on main wall, 1st row at rear. 1/4 bag (5.7L) cement and 25L sand (8 shovels)


18/8 1h moved remainder of 1m3 bag of melange with trailer. 72 shovels each trip, 3 trips 
19/8 3h filled trailer with clay. Stacked 300L on bank. 6 trailer loads left before pour
20/8 350L + 300L to the tip. ordered whacker
23/8 4h final removal of large lumps and back filled gaps with spoil, Used up quite a lot of soil.
27/8 AM dropped off 350L + 300L of soil. PM dropped off 350L + 300L of soil (none left!).
About 3.5cum taken to date.
Picked up whacker for the weekend (45€) And 11 roof trusses (Allwood)


28/8 Whacked soil, moved 1m3 of gravel (herrison) whacked in 2 layers (~70mm) then ~30mm sand. Watered sand to help it pack.
29/8 Built up entrance to garage, spread out 1m3 of gravel and whacked it.
30/8 AM returned whacker, built up drains and laid liner etc. PM laid 1st slab. 5 + 5 mixes (ie 500L). First 5, then mesh. About 3 hours plus polishing
31/8 laid 2nd slab. 5 + 5.3 mixes. First 5, then mesh (45 mins) then 1 hour for 2nd, plus polishing. Then tidied up in the afternoon. Moved about 200L of melange and similar in sand to the top of the garden.
1/9 cool and rainy. Bit of a dip on rear slab that fills with water and a smaller on at the front. Looked at existing roof detail. The wood on the far right is there to support a join on the facia. The noggin has been pushed down flat. You can see where it was to the right side of the wall plate.

2/9 moved remnants from penultimate bigbag on the drive to the garage for the slab laying.

4/9 took down guttering etc. 8h


5/9 put up frame 4h

6/9 8h set up rafters. Wall uprights completed. Angle 12 degrees. Technically too shallow for the altitude even with the suggested membrane, but it's very protected here. I've read the main reason for the membrane is to prevent condensation dripping off the tiles, but we get that anyway in the original garage and that is standard 20 degrees.
7/9 8h noggins on main roof. Membrane in and original roof re-fitted.
8/9 8h. Sheet of osb installed and end wall.  Most middle noggins on rafters fitted. Door end guttering temporarily glued in. Roof and end wall temporarily covered - storm due


9/9 It rained! about 11mm. Bit of ingress where it ran off the roof and bounced off the slabs. Started assembling garage door. Cast door reveal bases. Temporarily installed original guttering on extension. 

10/9 4h. Fitted osb to front corner. Cut frame for door. Sanded frame. Cut 15mm off rh concrete door reveal where it ran onto slab. 30 pieces of cladding to be oiled. Too wet.
11/9 8h LG oiled wood. Fitted rest of door timbers and door.


12/9 8h fitted cladding rear and side. Got some of the door parts assembled.
13/9 3h door fitting 
14/9 7h Added OSB behind door rails. Door very stiff. Steel edges grating plastic off weather strips. Dropped door onto foot. Removed panels and fettled edges. Door drifting to the right and spring hitting door.
15/9 1h improved rain protection. 7h door! Reassembled door then managed to push it off the end. Broke top edge of second panel up, so swapped it for the top one. Slight dent on 3rd panel. Fettled several metal sides, 2 lower rails bent where wheels were forced out with fall. Went back together better. No rubbing.
Got several tips from forums. Measured all panels - same size despite some being badly cut. Tried removing 1 spring, and lengthening wires, but this made opening harder. The more tension means that the rear wheels get closer to the track end, opening is easier, but closing has less resistance. Ended up with the spring datum moved from 145 to 105mm.
Rained hard


16/9 4h Installed door motor.
17/9 -
18/9 2h moved some OSB + started electrics. Tweaked door motor beam as it was rubbing on the top of the door.
19/9 2h. worked out roof tile spacing. Bit of electrics
20/9 5h picked up roof tiles. Finished all electrics. Fitted rest of the noggins.
21/9 - 
22/9 8h roof on. About 4h to batten and tile. Had a 50mm difference in tile run side to side; it measured 50mm less on the left side from existing roof to gutter compared to the right side. The tiles have a tolerance of 10mm, so over the 6 battens/7 rows I pushed the right side down 6mm and pulled the left side up 42mm (spaced 358mm left, 366 right).  A little tight on the top row onto the existing tiles, but this was partly as I'd laid the tiles a little close together left to right. 


About a 40mm gap between fascia and long wall. Will need an extra column on the right side, and possibly one over the door. Will need the special double peak tile there anyway. 50mm run out here top to bottom over the door. 
23/9 1h osb cladding over door.
24/9 put up some brackets to hold 3 strimmers and worked out if the trailer could be stored upright. 


Not quite enough space at the moment with the trailer parked there.
Problem solved! 


25/9 4h finished osb cladding (finally the end wall) and installed loop for hoisting trailer. Spent the afternoon working out how to stand the trailer up. Well, that bit is easy; getting it back down took a lot of effort!
203 hours to date (29 days)
26 -


27/9 8h cut rafter feet and fitted guttering.  Finished cladding on long side.  Black panels stop the rain splashing mud onto the cladding 
1/10 7h dug path to correct width and tapered it uphill. Put in temporary gulley to drain as heavy rain forecast. 
7/10 7h Filled trailer with the soil dug out last week and dug path to correct depth. Another load ready for the tip. Cut slabs. 
Note the red marker tape for the two conduits (middle of photo in bottom quarter on edge of path) that go up to the outside sockets. The conduits are about 10cm below. I found them again at the bottom of the footings - just out of the way. The tape is found again when cutting the steps.

8/10 4h cut trench for drains. 
9/10 8h fitted pipes to drain and back filled. Cut trench for upstand on path. Laid 5 drains and most of the slabs. 


10/10 4h fitted last slabs at front + drain at rear and partly graded to old


12/10 pm collected extra roof tiles and dumped 500kg of soil. Cut step slabs and trimmed juniper 


13/10 7h dug out and fitted steps. 2 barrows of mortar. 310kg of clay.
14/10 4h removed old steps and  tidied across to new steps. Pointed all paving.

Old steps and a typical pile of clay ready to be loaded into the car and trailer. 360 kg in the trailer, 300kg in the car. All weighed!

15/10 Dumped ~650kg of clay. 2h painted extension floor
16/10 7h fitted slabs at rear. Made up levels with melange beton and small amount of cement to bind. Worked well and set firm.


17/10 2h fitted last slabs
18/10 1h pointed slabs
About 36 days.
19/10 4h started roof at front.  Jiggled all the tiles so they lined up. There was a 30mm run out top to bottom at the front. The tile columns had been banana shaped. Now they are straight, you can clearly see that the original roof columns are banana shaped. 
20/10 6h finished roof and cladding at the front
23/10 3h started rear roof 
25/10 2h cut cladding around door
28/10 3h finished rear, soffit & infill. Cut gutter.
1/11 2h fitted new guttering facia, soffit & guttering
2/11 4h made extra bit of guttering from some ali & fitted.


6/11 3h fitted downpipe, finished original soffit, corner moulding, re-sealed pipe to water butts

Sunday 20 March 2022

Cubster mini service

 air filter clean

plugs left black tip, but grey

right clean.

Sounds like it's running a bit rough

Removed deck, clean sharpen

Drive belt worn out

Put original back on. Light crazing on sides.


Monday 14 February 2022

Philips LED ceiling light 1500 lumens

Philips 333623117 Plafonnier Cinnabar 

https://www.lighting.philips.fr/consumer/p/myliving-plafonnier/333653116

15W / 0.11A / 0.55pf nominal at 236V

Went faulty (flashing) after a few months service and replaced under warranty. Return of defective part not requested.

Rude not to repair it...

constant current smps outputs 87.2mA above a mains input of 208V

There are 4 modules in series. 

Each module has 14 leds, with 41.3V across the module.

I had a faulty led on one module, so bridged it. Module now has 38.6V volts. The rest still have 41.3V.


It's now September 2022 and the replacement light has gone faulty in 11 months. Same fault.
I've bridged the broken LED and we'll see. This is a product with 2 year warranty on the fitting and 5 years on the LEDs and the smps (go figure). So far 2 out of 2 have failed to make a fifth of the warranty period. Can't even blame a batch fault.
I have noticed that the fitting glows when it's off. There is an earth terminal but no recommendation to fit an earth. I've fitted a X2 0.1uF cap N to E terminal and they glow no more. Maybe this leakage current was enough to pre-roast the LEDs?  We'll see.
I do also have a tube light LED Philinea 45W made by Philips which glows when off. No earth terminal and no problems since installing it July 2019, but it's a 60W equivalent vs 80W for the faulty one. A lot less stress and heat!

more fire wood

 A friend wanted some trees gone. A 50yo oak 60cm/15m, a large ash and a small ash. I got the easy job of felling the trees, then 10 trips to move the wood home. My friends spent days clearing up!

say 4 stere, so 2 years heating.


27/2 8h splitting oak and ash. Built a new wood store (0.75 x 1.1 x 1.9m = 1.6m3) near the house to hold a year's worth of wood. Filling it with ash today. Most ash now split.

28/2 1h all ash now split and stacked.

Sunday 6 February 2022

Hedge cutter service

 Dewalt DCM563. New 22/11/18

Bit disappointed with this having just serviced it, I see the motor is nearly worn out. It's not brushless like the drills. It's not like I use it every day. I have 300m of hedge I cut twice a year, plus 300m I cut elsewhere. Or around 4 days per year.

The blade is pretty worn too on the back side where it's supposed to be flat.

A new motor assembly - motor not available (brushes not available as the motor is sealed) is £48/60€ They've even gone to the trouble of pressing a plate over the motor mounting screws so you can't even source the motor.


The motor part number is 90626374, and this pops up on a V20 fatmax, for £27/40€

W180430 19.5V S-494 755


Worn brush on the right side just visible. 


The brushes might be swappable.  They are approx 5.5mm x 7mm, with a square locator on the back which is 5.5mm x 4mm.

This seems a good start 

https://www.aliexpress.com/item/4000265047084.html

These are known as RS895/ 875/ 887 motors, although the case size of this motor is the next size down known as a RS755 (in the part no) but the same brushes as a RS750. 755/750 brushes are a lot smaller, reducing the contact with the comm. Important? Don't buy a complete brush assembly because 1. the dewalt one has suppression caps 2. slightly different moulding 3. different arms 4. you can't easily remove brushes from the arms.

See notes + more photos on PC.

New brushes are 4.8mm wide but are too long at 7.2mm from indent. Need to sand them back to about 6mm. Once fitted, the motor takes between 2.2 and 2.8A at 18.5V. I'll need to put some spots of weld to hold the back on. There isn't enough metal to peen.

Soldered some wire to bridge the holes in the brush holders.


A new blade is £87/100€

Why am I quoting in £?  Because despite buying the product in France, no-one stocks them. Poland, Finland, UK. But not France.

A new tool is 118€

Guess this is going binward and I'll be changing brands.

Thanks Dewalt.

1/10/23 Replaced the brushes again. One holder completely missing. Bought complete 895 brush/case assemblies (https://www.aliexpress.com/item/1005005890644120.html), but they are too big (it's a 755 case ie 40mm dia) Brushes are perfect size and can be carefully removed from holder. Cut off a new holder and soldered it onto the old bracket. Ensure it's nicely central on the motor.

Ensure the current is less than 2.5A at 5V before welding. The plate is a bit bent. Will take about 3.3A at 18.5V with the blade attached. Ensure to straighten the blade and WD40.