Friday, 14 February 2020
Chipper Shredder
Bolts holding the blade on
3 x M10 8,8 with 4mm hex heads. Recommended torque ~55Nm/40lbft.
10/2/20 All bolts loosened and re-torqued. Were over-tight.
Tuesday, 4 February 2020
Hedges
Reduced southern hedge (excluding laurel) to cheek height. Removed ~1m
Reduced western hedge to cheek height from camellia to pergola. Removed ~1.5m
Took less than an hour to shred each hedge.
Removed leggy growth ie pollarded the willow by the gates
trimmed oak and other shrub chez Grillets touching the phone line.
Reduced western hedge to cheek height from camellia to pergola. Removed ~1.5m
Took less than an hour to shred each hedge.
Removed leggy growth ie pollarded the willow by the gates
trimmed oak and other shrub chez Grillets touching the phone line.
Tuesday, 21 January 2020
Thursday, 9 January 2020
Roof tiles
The roof was put on a shade over 10 years ago. They are standard clay tiles - Tuile gallo-romane rouge - MONIER, Réf: GL1B601.
2 years ago I replaced 3 with hairline fractures. This year it's 6, but I'm convinced I found a lot more in the summer.
2 years ago I replaced 3 with hairline fractures. This year it's 6, but I'm convinced I found a lot more in the summer.
Sunday, 22 December 2019
Worx to Dewalt battery converter
Worx tools come with good reviews. However, most users say the batteries last no time at all - just long enough to be out of warranty.
I got a simple Worx battery strimmer to do very light work. Amazon were kind enough to dent the boxes on a few, so they sold them off at a very attractive price. And better still, it didn't come with battery or charger.
I already have Dewalt batteries. Dewalt converters to Makita and Milwaukee exist, but not Worx. You can get Dewalt sockets from Aliexpress for around 10€ which have been 3D printed. You can get the plans on line too. Given the application I felt that the 3D printing may de-laminate as the battery hangs fully off it. That and I didn't want to wait 2 weeks and risk paying 16€ in custom fees.
I've done plastic mods and welding before. I had a plastic corner piece that came with some product or other which was nearly the right shape. I bent the sides over and put some copper terminals on. Then a few bits of ply to make a plug to suit the tool, and 2 fast-on terminals and voila ! Or 3 hours of playing. The plastic was plenty malleable at 300C (use a SMD re-work tool)
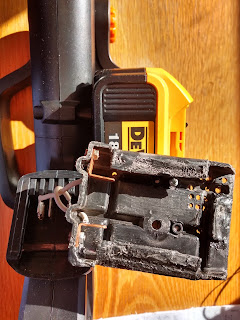


It's no oil painting, but it's solid.
Hopefully the tool won't let me down now.
For info, there is a PCB inside the tool, which has a MOSFET to turn the motor on and off, a protection diode and another chip, which might be LVD.
I got a simple Worx battery strimmer to do very light work. Amazon were kind enough to dent the boxes on a few, so they sold them off at a very attractive price. And better still, it didn't come with battery or charger.
I already have Dewalt batteries. Dewalt converters to Makita and Milwaukee exist, but not Worx. You can get Dewalt sockets from Aliexpress for around 10€ which have been 3D printed. You can get the plans on line too. Given the application I felt that the 3D printing may de-laminate as the battery hangs fully off it. That and I didn't want to wait 2 weeks and risk paying 16€ in custom fees.
I've done plastic mods and welding before. I had a plastic corner piece that came with some product or other which was nearly the right shape. I bent the sides over and put some copper terminals on. Then a few bits of ply to make a plug to suit the tool, and 2 fast-on terminals and voila ! Or 3 hours of playing. The plastic was plenty malleable at 300C (use a SMD re-work tool)


It's no oil painting, but it's solid.
Hopefully the tool won't let me down now.
For info, there is a PCB inside the tool, which has a MOSFET to turn the motor on and off, a protection diode and another chip, which might be LVD.
Monday, 11 November 2019
Gate motor
The RH gate motor has always been a bit weaker than the other, and usually requires a service before winter to ensure it runs properly when the temperature drops.
I'm pretty sure the motor itself is shot. It's not possible to fully strip it, as there is a cog on the output shaft which can't be removed. I'm told it's either cryo fitted or glued. I can't risk damaging it as there are no spares for the SCS 2 ram (verin). The best I've managed is access to the commutator which I thoroughly scraped, cleaned and leveled. The gaps between poles are full again, but it runs ok with the 2 supplementary gearboxes removed. I found the first box a bit stiff; it seemed to have too much black (molybdenum?) from the next box and not the green stuff which had dropped out the bottom. A clean and re-grease with surplus grease made it feel a bit better.
A few months ago I dropped a tree on the gate motor. A big tree. The motor had been a bit worse and when I finally took a closer look, all 3 rods that run the length were bent, and, worse, the end caps had fallen apart. This meant that hold the whole thing was flapping about a bit.
The rods straightened quite easily, and the end caps are back in place, but still in pieces. A few stainless washer stop the rods from pulling through the caps.
Off load running current in is 1.1-1.2A, out is 1.2-1.3A. I think this is a bit high, but normal for this motor.
I think I was conned when I bought this off ebay. The electronics are dated 2007, but the motors are dated 1998. The part number (3j3712 johnson) gives nothing. I think it's a HC785LP-025 42mm diameter https://www.johnsonelectric.com/en/product-technology/motion/dc-motors/industry-dc-motors. Datasheet readily available.

Sunday, 10 November 2019
Water meter sensor
For nearly 5 years I've been monitoring water usage. Thoughtfully, the water company provided a meter with a special slot to insert a reed sensor, which I used for about a month until they decided to install an automatic reader. Whilst having brass case, there must be some magnetic shielding, as a reed sensor adjacent detects nothing.
Undeterred I bought an AH3503 electronic sensor. A single one will detect the meter magnet, but the variance is in the order of 30mV. Detectable with a comparitor, but it doesnt take much to ruin the reading. So I put 2 sensors back to back into a differential amplifier. It worked well, and I got an output of about 0.6V to 2V with the meter. I made a sensor, and put a ferrite in for good measure, as this somehow magnified the effect.
Several times per year I had to repair it, usually some sort of water ingress (the meter is underground about 70m from the house) despite conformal coating. You can see the home made vero board and the black heatshrink (~65mm long) removed from the sensor pair on the right. The adjacent device is the sensor and this was the latest failure. Despite being sealed in glue lined heatshrink, verdigris got in rotted off the legs. I started off with a LF351 in a socket, then removed the socket, then bodged in a LMV321 rail to rail device covered in wax.
I had a bit of space left on a recent pcb order, so I made a compact replacement sensor. It's small enough (double sided) to hold both sensors soldered on the bottom, 4 resistors, 2 capacitors, a diode and a SOT23 LMV321 opamp. A very respectable output of 0.06V to 4V (5V supply). The finished device (4 coats of hair spray) and heatshrink is little bigger than the original sensors alone. The output in situ is 0.1V to 1.6V as the magnet moves in the meter. Supply volts are around 4.6V once it's made the 70m trip on cat 5 CCA cable. Current consumption is trivial.
Hopefully the water company won't think I'm trying to frig their meter somehow. I say their meter. I had to buy it and pay for the install.
1/6/20 random readings. Either the sensor has been touched or it just moved. It was at an angle so a bit far away to register. Tested with tip of little yellow screwdriver and got the range as above. It was below the official sensor, but it fits above a lot tighter. In use it goes from 2.215 to .
Undeterred I bought an AH3503 electronic sensor. A single one will detect the meter magnet, but the variance is in the order of 30mV. Detectable with a comparitor, but it doesnt take much to ruin the reading. So I put 2 sensors back to back into a differential amplifier. It worked well, and I got an output of about 0.6V to 2V with the meter. I made a sensor, and put a ferrite in for good measure, as this somehow magnified the effect.
Several times per year I had to repair it, usually some sort of water ingress (the meter is underground about 70m from the house) despite conformal coating. You can see the home made vero board and the black heatshrink (~65mm long) removed from the sensor pair on the right. The adjacent device is the sensor and this was the latest failure. Despite being sealed in glue lined heatshrink, verdigris got in rotted off the legs. I started off with a LF351 in a socket, then removed the socket, then bodged in a LMV321 rail to rail device covered in wax.
 |
| new pcb left, old sensor + circuit right |
 |
| new sensor sealed up |
I had a bit of space left on a recent pcb order, so I made a compact replacement sensor. It's small enough (double sided) to hold both sensors soldered on the bottom, 4 resistors, 2 capacitors, a diode and a SOT23 LMV321 opamp. A very respectable output of 0.06V to 4V (5V supply). The finished device (4 coats of hair spray) and heatshrink is little bigger than the original sensors alone. The output in situ is 0.1V to 1.6V as the magnet moves in the meter. Supply volts are around 4.6V once it's made the 70m trip on cat 5 CCA cable. Current consumption is trivial.
Hopefully the water company won't think I'm trying to frig their meter somehow. I say their meter. I had to buy it and pay for the install.
1/6/20 random readings. Either the sensor has been touched or it just moved. It was at an angle so a bit far away to register. Tested with tip of little yellow screwdriver and got the range as above. It was below the official sensor, but it fits above a lot tighter. In use it goes from 2.215 to .
Subscribe to:
Posts (Atom)