oil change 3.75 L + jokoparts/herth+buss J1313033 filter element
140842 km
Wednesday, 9 September 2015
Thursday, 27 August 2015
Shower Mixer
mitigeur de douche thermostatique
The mixer has always been a bit poor and hard to adjust. Pretty sure I've had it apart before. About €45 from Bricomarche 2-3 years ago. Just recently it's almost impossible to adjust the temperature as it's so stiff, and full hot is blending in cold. It's a common problem in the forums, and the mixer cartridge is excluded from the guarantee. I didnt look too hard, but the cheapest cartridge was around €90, and they all look pretty similar. Castorama sell a complete thermostatic mixer at €30. Mail order from €23 + delivery.
We are 2 on a scale of 1 to 10 water hardness, 1 being soft.
The cartridge, below, is held in with 1 screw, but the scale/soap held it fast. Luckily there are some flats that allow it to be twisted to free it, then drift it out carefully using the screw hole. Don't remove the other end as the seating washer is a critical one and didn't look common. This on/off valve shuts the output, so failed seals in the mixer will just keep leaking.
To open the cartridge put the flats near the control in the vice, then use a 24mm spanner on the flats further up. Sadly the opening is too small for the spanner, even with a bit of filing, so the grips took care of it.

The 3 left most items (after the body), should spring out. Mine were ceased, so carefully pressed out. Removed all the scale with emery cloth on all faces and re-assembled with a good dab of silicon. Same with the valve body.
The item to the right of the black pin has a movable, sprung plate. This was ceased. Freed by gently squeezing in a vice and silicon sprayed in.
On the cartridge, the end that isn't the control, is the mixed out. The next mesh is hot, then cold. The item pushed by the spring is the thermostatic bit. Fully left, it shuts off hot & vice versa. Turning the knob to °C physically forces the thermostatic bit to cold.
To put the temp control in the right place, turn CW ie towards cold until resistance is felt, then continue until it feels tight - its about the distance between 20 & °C . Place the knob so the 'setting dot' matches °C . The knob should turn the opposite way to beyond 50 and to within about 5mm of °C.
At room temperature, selecting full hot will mean the cold port is blocked. Once the thermostatic bit gets cold eg during tests with cold water, water will freely pass from the hot inlet to outlet, irrespective of setting temp. Also, the resistance noticed above for setting the knob will go. During testing with air, noticed the hot passes to cold. Once wet, the NRVs built into the inlet stop this.
The valve does pass a little on full hot or cold, as it's just metal to metal contact on the mix bit.
Probably need to fully exercise the valve daily to stop scale forming on the thermostatic seat.
Very similar to Hudson Reed Cartouche thermostatique pour mitigeur de baignoire îlot
Référence Produit : SPN322C
July 2017. Mixer would not give full hot, so stripped and rebuild. No change, so replaced it with a Aquatrends Siena, allegedly a €48 item that Amazon had 'reconditioned' for €19 ie dented box. Overall length 259mm, a bit shorter than the old one. Ceramic disc.
Tuesday, 25 August 2015
Wednesday, 19 August 2015
Bread Machine
About 5 years ago we bought a Quigg (German) branded bread maker, based on its low power consumption for off-grid use, and price. It was pretty cheap at €45. The seal on the baking tin failed very quickly, so oil was needed to keep it free on every use. Occasionally it would reset itself, normally towards the end of the bake, which meant the paddles tore a hole in the bread.
Over the years it has been apart for
1. fixing the reset; poorly put together and bits shorting out
2 replaced a dodgy looking capacitor on the power supply
3 failed over temperature sensor
4 drive bearings going oval
The last item, combined with a failing tin seal has condemned it. In trying to find spares, it turned out that this item was a re-labelled Moulinex product.
We've now got a Kenwood BM250, which claims to be 'designed in UK, made in china'
The display is identical to the Quigg one, as is the annoying bleep on power up. From the little I can see through the base, the gears are similar. Whilst there can't be many variants on some items, the element and tin are fabricated in an identical fashion, even down to the machining marks.
The tin bearing failed after ~ 3 years and was nursed until July 2019, where I yanked it out and put some normal low temp o-rings in until a high temp bearing + seal turned up. Turns out the seal is non-replaceable unless you split the tin at the rivets.
https://www.instructables.com/id/Kenwood-Bread-Maker-BM-450-Bread-Pan-Shaft-Seal-Re/
The original is marked 19mm, but that's at the bottom; it's 17mm at the top, which is the largest you can push in. The first seal worked its way out and failed. The second one I glued in with liquid gasket which is also temp rated. Seems ok after a few uses. (Sep 19)
Monday, 13 July 2015
Finished the en-suite
Well, almost. It's a lot more finished than it was 5 years ago when we started using it, needing just the skirting.
Put the half-floor tiles on the wall, as a skirting. This would have been easier if the guy that had installed the log burner hadn't damaged a lot of them.
Let me explain. The so-called professional that installed the log burner decided that it had to be fitted on ceramic tiles (it didn't if he'd read the manual) Unfortunately, he also botched the flue, so needed around 5cm of tiles to jack the fire up. The only box of tiles were the ones left for the en-suite skirting. By rocking and scraping the fire side to side while he 'installed' the fire and tiles, he scratched around 20 of the 25 tiles. Luckily, there are lots of blind spots in an en-suite, so the damage isn't readily obvious on the tiles, but it just took much longer to sort, move and cut damaged tiles.
I needed some caulk, around 4m. Ended up mixing about 50g of flour with the same volume of PVA and a drop of water, then put it in an old skeleton gun tube. We'll see how it lasts once painted, but I've yet to find a caulk that doesn't crack after a few years.
Now to paint the tile edge to match the wall.
Sunday, 5 July 2015
DIY grain mill, or how to turn wood without a lathe
I brew beer. You can buy crushed grain, but it's more expensive and goes off quicker. As I go through 25kg in about a year, it's better whole, uncrushed. It's also quite difficult to find mail order. Buying crushed quantities less than 25kg doubles the cost, so €33 to €66.
Commercial crushers are around £150, being knurled steel rollers in a frame.
Having had a go at a crusher using a 13mm roughed up rod and a fixed plate (ok, but very very slow ~2kg/hour) I got a quote for some turned steel 40mm diameter, 200mm long, knurled. That worked out at around £50 + delivery.
You can use a corona style flour mill, but this is generally reckoned to be no good longer term, as the bits wear out, the genuine ones are expensive, and the copy ones are junk.
A google revealed that people had make wooden mills.
The hard bit is making round wood. Anything bought, like a rolling pin, cannot be post-drilled perfectly in the centre. As I have a few tonnne of beech and oak, it seemed a good idea to make some round stock.

 Starting with a log that I cut for firewood this year. About 3 years old.
marking out the round - about 50mm. Hack it to rough size with an axe. Square cut one end. Mark centre on other end. Drill the hole on a pillar drill to suit a threaded bar. I used 8mm. Length was dictated by the longest drill bit.
Secure wood onto bar with 4 nuts and a few washers.
The 'lathe' 2 brackets to hold the blank at the ends. The uprights will support the router. All this lot is clamped to a work bench.


 Mount the blanks and stick a very low rev motor on the shaft


Add a router. Start the rotation, ACW in my case.

 Take small slices in many passes and create the stock.
If one end is a larger diameter than the other, pack the larger diameter end with half the diameter difference.

Voila. A run out of pretty much 0. A taper of around 0.3mm.
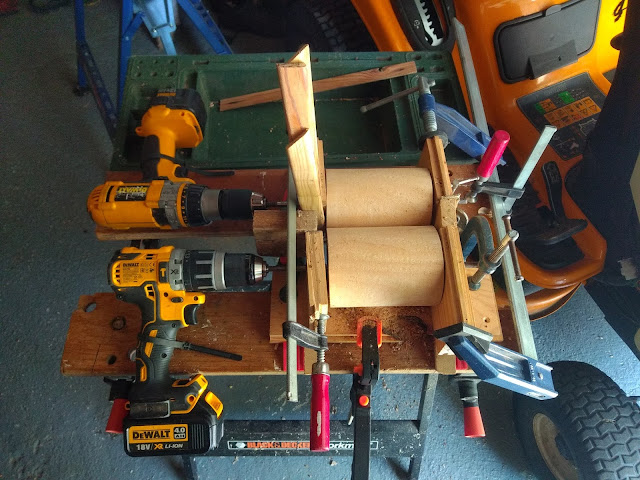
 Next make a box and mount the rollers. One is 42mm, other 50mm. These were the biggest bits in the store. I added some horizontal slots to one roller for grip, but as both rollers must rotate, it doesnt really matter. It is reckoned that about 100mm, you don't need grip or drive both rollers (1 youtube video shows a metal version make out of 4" steel tube with just the odd groove) The 8mm shaft is rolled steel I had lying around. I drilled a 2mm hole in the shaft, fitted a pin and made a corresponding slot in the wood to get drive.
This moves about 0.5kg/minute, but does need two drills at say 200rpm. I'll need to make some cogs, and more importantly add some bearings. The box above just used a dab of grease and the gap adjustment to 1mm was done with some drilled plate screwed over over-size holes in the frame.
The rollers have a bit of denting, but are hardly marked. I'll try flaming the wood, which is apparently done on baseball bats. And make some bigger rollers. More importantly, mount the box over a barrel somehow, as it fills after about 700g of grain has passed through.
Bearings on order. 8mm shafts are used on skateboards, so bearings are readily available in 4 packs for a few £.
I have a motor and gearbox from an old can opener somewhere which should work well..
A few extra pictures from a later turning. I took ~200mm slices of beech, put a rod down the middle and reduced them to 100mm. The rig grew a little, but the same principal. And some skateboard bearings. Run out & taper around 0.1mm
Currently waiting to see if the 3 I cut will split before assembling a crusher.


Update 2/8/20. 5 years on, the rollers have not split. Did a quick test to check they work well enough to justify a full rig. Had to run both rollers, but only very slowly. Gap varied a lot, but statically about 0.5 - 1mm. Ran the grain through a second time, but it didnt change it very much. Rollers have a patina, but no great dents.
Commercial crushers are around £150, being knurled steel rollers in a frame.
Having had a go at a crusher using a 13mm roughed up rod and a fixed plate (ok, but very very slow ~2kg/hour) I got a quote for some turned steel 40mm diameter, 200mm long, knurled. That worked out at around £50 + delivery.
You can use a corona style flour mill, but this is generally reckoned to be no good longer term, as the bits wear out, the genuine ones are expensive, and the copy ones are junk.
A google revealed that people had make wooden mills.
The hard bit is making round wood. Anything bought, like a rolling pin, cannot be post-drilled perfectly in the centre. As I have a few tonnne of beech and oak, it seemed a good idea to make some round stock.

 Starting with a log that I cut for firewood this year. About 3 years old.
marking out the round - about 50mm. Hack it to rough size with an axe. Square cut one end. Mark centre on other end. Drill the hole on a pillar drill to suit a threaded bar. I used 8mm. Length was dictated by the longest drill bit.
Secure wood onto bar with 4 nuts and a few washers.
The 'lathe' 2 brackets to hold the blank at the ends. The uprights will support the router. All this lot is clamped to a work bench.


Add a router. Start the rotation, ACW in my case.

 Take small slices in many passes and create the stock.
If one end is a larger diameter than the other, pack the larger diameter end with half the diameter difference.

Voila. A run out of pretty much 0. A taper of around 0.3mm.

This moves about 0.5kg/minute, but does need two drills at say 200rpm. I'll need to make some cogs, and more importantly add some bearings. The box above just used a dab of grease and the gap adjustment to 1mm was done with some drilled plate screwed over over-size holes in the frame.
The rollers have a bit of denting, but are hardly marked. I'll try flaming the wood, which is apparently done on baseball bats. And make some bigger rollers. More importantly, mount the box over a barrel somehow, as it fills after about 700g of grain has passed through.
Bearings on order. 8mm shafts are used on skateboards, so bearings are readily available in 4 packs for a few £.
I have a motor and gearbox from an old can opener somewhere which should work well..
A few extra pictures from a later turning. I took ~200mm slices of beech, put a rod down the middle and reduced them to 100mm. The rig grew a little, but the same principal. And some skateboard bearings. Run out & taper around 0.1mm
Currently waiting to see if the 3 I cut will split before assembling a crusher.


Update 2/8/20. 5 years on, the rollers have not split. Did a quick test to check they work well enough to justify a full rig. Had to run both rollers, but only very slowly. Gap varied a lot, but statically about 0.5 - 1mm. Ran the grain through a second time, but it didnt change it very much. Rollers have a patina, but no great dents.

Sunday, 21 June 2015
De-frosted freezer
De-frosted freezer, about 15 mins & cleaned rear fins.
First fin clean since new (3 years)
First fin clean since new (3 years)
Subscribe to:
Posts (Atom)