It's started.
Existing garage 5.28 x 5 = 26.7m2, but lost 8m2 to utility
Extension 2.68 x 4.6m = 12m2
6/7 1h digging 5 barrows


2/9 moved remnants from penultimate bigbag on the drive to the garage for the slab laying.
5/9 put up frame 4h


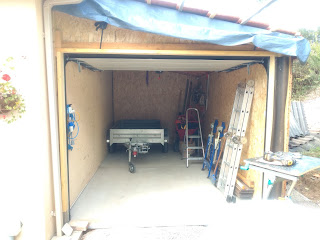


 Note the red marker tape for the two conduits (middle of photo in bottom quarter on edge of path) that go up to the outside sockets. The conduits are about 10cm below. I found them again at the bottom of the footings - just out of the way. The tape is found again when cutting the steps.


 Old steps and a typical pile of clay ready to be loaded into the car and trailer. 360 kg in the trailer, 300kg in the car. All weighed!


5/7/21 Emptying and tidying 1 day.
 |
| Empty the wood shed |
7/7 1.5 hours. 5 barrows. Just under half of the old shed.
16/7 2-300L taken to tip. Less than 1/4 left of base.
21/7 dug out bank. Trailer full. Removed some of the stones at old shed entrance. Got a good pile of earth stored on slope.
22/7 2-300L taken to tip.
26/7 dug out the rest of the bank, left ready to go into trailer 4h
27/7 5h. took down old shed. Moved path over to near new location. Dug out old path base - 5 barrows of stone in pile.
 |
| Move the path temporarily |
 |
| Shed gone |
 |
| Protection from the rain! |
29/7 3 hours to mark wall foundations and fill the car + trailer.
5/8/21 2 hours unload sand, gravel etc, 2 hours fill car + trailer
6/8 moved 2m3 of ballast and gravel ~ 2 hours
8/8 4h dug out the long wall foundations to depth (0.55 ish) Trailer filled
9/8 4h dug out rear + door foundations
12/8 laid foundations 6h including clear up. Mixer wont do a 100L mix. 13 mixes / 6.5 bags cement. 32C. Stuff laid at 11am had gone off by 4pm.
110L melange + 35kg bag cement = 100L concrete
13/8 car full of clay to the tip.
16/8 4h. 1st row main wall. 1/2 bag (11.5L) cement. moved 24 shovels in 4 barrows = 300L. hmmm
17/8 rain am. 4h 2nd row on main wall, 1st row at rear. 1/4 bag (5.7L) cement and 25L sand (8 shovels)
18/8 1h moved remainder of 1m3 bag of melange with trailer. 72 shovels each trip, 3 trips
19/8 3h filled trailer with clay. Stacked 300L on bank. 6 trailer loads left before pour
20/8 350L + 300L to the tip. ordered whacker
23/8 4h final removal of large lumps and back filled gaps with spoil, Used up quite a lot of soil.
27/8 AM dropped off 350L + 300L of soil. PM dropped off 350L + 300L of soil (none left!).
About 3.5cum taken to date.
Picked up whacker for the weekend (45€) And 11 roof trusses (Allwood)
28/8 Whacked soil, moved 1m3 of gravel (herrison) whacked in 2 layers (~70mm) then ~30mm sand. Watered sand to help it pack.
29/8 Built up entrance to garage, spread out 1m3 of gravel and whacked it.
30/8 AM returned whacker, built up drains and laid liner etc. PM laid 1st slab. 5 + 5 mixes (ie 500L). First 5, then mesh. About 3 hours plus polishing
31/8 laid 2nd slab. 5 + 5.3 mixes. First 5, then mesh (45 mins) then 1 hour for 2nd, plus polishing. Then tidied up in the afternoon. Moved about 200L of melange and similar in sand to the top of the garden.
1/9 cool and rainy. Bit of a dip on rear slab that fills with water and a smaller on at the front. Looked at existing roof detail. The wood on the far right is there to support a join on the facia. The noggin has been pushed down flat. You can see where it was to the right side of the wall plate.
2/9 moved remnants from penultimate bigbag on the drive to the garage for the slab laying.
4/9 took down guttering etc. 8h

6/9 8h set up rafters. Wall uprights completed. Angle 12 degrees. Technically too shallow for the altitude even with the suggested membrane, but it's very protected here. I've read the main reason for the membrane is to prevent condensation dripping off the tiles, but we get that anyway in the original garage and that is standard 20 degrees.
7/9 8h noggins on main roof. Membrane in and original roof re-fitted.
8/9 8h. Sheet of osb installed and end wall. Most middle noggins on rafters fitted. Door end guttering temporarily glued in. Roof and end wall temporarily covered - storm due
9/9 It rained! about 11mm. Bit of ingress where it ran off the roof and bounced off the slabs. Started assembling garage door. Cast door reveal bases. Temporarily installed original guttering on extension.
10/9 4h. Fitted osb to front corner. Cut frame for door. Sanded frame. Cut 15mm off rh concrete door reveal where it ran onto slab. 30 pieces of cladding to be oiled. Too wet.
11/9 8h LG oiled wood. Fitted rest of door timbers and door.
12/9 8h fitted cladding rear and side. Got some of the door parts assembled.
13/9 3h door fitting
14/9 7h Added OSB behind door rails. Door very stiff. Steel edges grating plastic off weather strips. Dropped door onto foot. Removed panels and fettled edges. Door drifting to the right and spring hitting door.
15/9 1h improved rain protection. 7h door! Reassembled door then managed to push it off the end. Broke top edge of second panel up, so swapped it for the top one. Slight dent on 3rd panel. Fettled several metal sides, 2 lower rails bent where wheels were forced out with fall. Went back together better. No rubbing.
Got several tips from forums. Measured all panels - same size despite some being badly cut. Tried removing 1 spring, and lengthening wires, but this made opening harder. The more tension means that the rear wheels get closer to the track end, opening is easier, but closing has less resistance. Ended up with the spring datum moved from 145 to 105mm.
Rained hard
16/9 4h Installed door motor.
17/9 -
18/9 2h moved some OSB + started electrics. Tweaked door motor beam as it was rubbing on the top of the door.
19/9 2h. worked out roof tile spacing. Bit of electrics
20/9 5h picked up roof tiles. Finished all electrics. Fitted rest of the noggins.
21/9 -
22/9 8h roof on. About 4h to batten and tile. Had a 50mm difference in tile run side to side; it measured 50mm less on the left side from existing roof to gutter compared to the right side. The tiles have a tolerance of 10mm, so over the 6 battens/7 rows I pushed the right side down 6mm and pulled the left side up 42mm (spaced 358mm left, 366 right). A little tight on the top row onto the existing tiles, but this was partly as I'd laid the tiles a little close together left to right.

About a 40mm gap between fascia and long wall. Will need an extra column on the right side, and possibly one over the door. Will need the special double peak tile there anyway. 50mm run out here top to bottom over the door.
23/9 1h osb cladding over door.
24/9 put up some brackets to hold 3 strimmers and worked out if the trailer could be stored upright.


Not quite enough space at the moment with the trailer parked there.

Problem solved!
25/9 4h finished osb cladding (finally the end wall) and installed loop for hoisting trailer. Spent the afternoon working out how to stand the trailer up. Well, that bit is easy; getting it back down took a lot of effort!
203 hours to date (29 days)
26 -

27/9 8h cut rafter feet and fitted guttering. Finished cladding on long side. Black panels stop the rain splashing mud onto the cladding
1/10 7h dug path to correct width and tapered it uphill. Put in temporary gulley to drain as heavy rain forecast.
7/10 7h Filled trailer with the soil dug out last week and dug path to correct depth. Another load ready for the tip. Cut slabs.
8/10 4h cut trench for drains.
9/10 8h fitted pipes to drain and back filled. Cut trench for upstand on path. Laid 5 drains and most of the slabs.
10/10 4h fitted last slabs at front + drain at rear and partly graded to old
12/10 pm collected extra roof tiles and dumped 500kg of soil. Cut step slabs and trimmed juniper

13/10 7h dug out and fitted steps. 2 barrows of mortar. 310kg of clay.
14/10 4h removed old steps and tidied across to new steps. Pointed all paving.
15/10 Dumped ~650kg of clay. 2h painted extension floor
16/10 7h fitted slabs at rear. Made up levels with melange beton and small amount of cement to bind. Worked well and set firm.

17/10 2h fitted last slabs
18/10 1h pointed slabs
About 36 days.
19/10 4h started roof at front. Jiggled all the tiles so they lined up. There was a 30mm run out top to bottom at the front. The tile columns had been banana shaped. Now they are straight, you can clearly see that the original roof columns are banana shaped.
20/10 6h finished roof and cladding at the front
23/10 3h started rear roof
25/10 2h cut cladding around door
28/10 3h finished rear, soffit & infill. Cut gutter.
1/11 2h fitted new guttering facia, soffit & guttering
2/11 4h made extra bit of guttering from some ali & fitted.

6/11 3h fitted downpipe, finished original soffit, corner moulding, re-sealed pipe to water butts


