Tuesday, 8 May 2018

Deck maintenance

The deck will have been down 7 years in a few months. For the last year, bits have been a bit firmer, or a bit saggy. A check last year showed a few joists had rotted out, which is pretty normal for untreated Douglas Fir, particularly when it gets wet from on top, and the bottom and sides have increasingly been filling with leaves and clay.

Spot the carefully placed flower pot.


It seems that the spring rain the last 3 years and mediocre summers, plus the northern part of the west face rarely sees sun, has taken its toll. Originally I left quite a lot of clay below and in between the joists, which liquefied and leveled out. This is slowly being removed to reveal a much higher water table than 2011 (now about 18cm below DPC). The weed suppressing matting also wicks water, so any in touch with wood was rotted. The hop had spread its roots a long way (mainly to the low spot where the new drain is) and were chopped out; the roots near the original plant were put back under the matting. A few bits died, but it's started sprouting again.  The vine didnt seem to have many roots. The honeysuckle had done a good job of keeping clear of my digging, and seems ok.


This is about 56 tiles up, out of 159.
All this clay is being barrowed uphill to fill an old ditch. The rain continues to fall which limits the load, as you just cant get grip. About 2m3 in total. 

The tiles also needed cleaning and oiling. They were jet washed first, but hand prep prior to oiling. 56 tiles prepared and painted in 4 hours. Paint is 1L cold pressed linseed oil, 200ml turps, 30ml siccatif (drying agent banned in some countries due to toxicity. Speeds drying)
Stacked on end to dry. For all the tiles, I used just under 3L of oil for 1 coat, nearly 2L of glue D3 glue and almost 800 25 x 4.5 screws.
All joists where covered in damp proof membrane. Time will tell if this is a bad idea; previously the joists soaked up the water. Now the water sits on the membrane and may rot out the tile bases.

Tiles then relaid temporarily on new joists, and another 50 taken up. More temporary joists, and the remaining tiles removed under the covered area (different look to that batch - several marked Burmese teak) and replaced with the batch from the kitchen end. The house isn't quite square, so there is a bit of a twist from the covered area to the main area. A reference line of tiles is screwed down at joist 10 in the long run, but the deck just isn't square towards the kitchen.
9 joists replaced, and some cut down and swapped. 1 joined as I couldn't face buying more wood.
A gravel filled trench runs the length of the deck and drains from the middle to the hedge (in line with the rose). This will join up to a new drain slightly further uphill; a job that has been on the list for a couple of years. The trench finally went dry about a week after the sun came out; it nicely filled when it rained and flowed well.


D:\photos\Garden\2018\Deck Renovation

Tuesday, 24 April 2018

MT-07 error

Error display on MT-07

Fixed under warranty, just. No idea of the cost.
Air box pressure sensor


engine running, no message


Turned ignition off, then on. Engine not running (see rev counter)

Friday, 20 April 2018

Extension leads


All 1.5mm
Yellow 25m 14V drop @2kW
blue 15m 13v drop
armoured 12V

8m 4c, prob 2.5m 11V

CSA vs diameter
.75mm2 1mm
1 1.1
1.5 1.4
2 1.5
2.5 1.8
4 2.3


Cubster mantenance 2018

2018
20/4 Blades sharpened, air pre-filter washed.
Plugs NGK BPR4ES as manual. Quite black. RH gapped. LH ok
Moved throttle to drop idle speed, now at 1500, which is spec, but sounds fast.
Oiled throttle & choke bowden cables and assemblies


Wednesday, 7 March 2018

Patio doors

19/7/20 replaced RH wheel of RH kitchen door. Cleaned other - not too bad.
7/19 some replaced - not noted
7/3/18 Rollers replaced 1 door closest to garage

14/4/18 Rollers replaced 1 door  to terrasse
11/9/18 Rollers replaced 1 door  to terrasse

Thursday, 28 December 2017

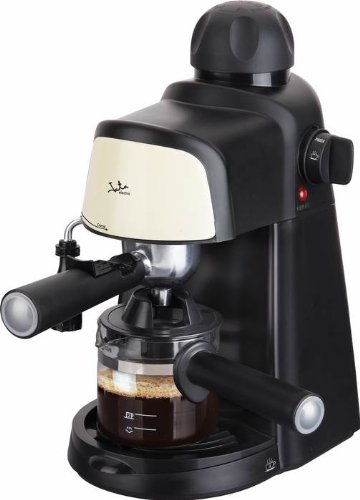
Jata CA704 Cafetière Demi Expresse

Bought this coffee machine in July 2016. It's been descaled a couple of times, but as we live in a relatively soft water area, I don't pay that much attention.
There are a bunch of these machines which look pretty similar in a price range of €25 (Gifi)  to €70. This one has a control board and 12V relay which turns off the heater after ~10 mins.


Jata CA704 Cafetière Demi Expresse 26 x 21,5 x 33,8 cm

It had started producing little coffee. I descaled it and it was fine for a day, then a problem again. Having striped it, it seems scale had caught up in the narrow pipes in the control valve.
To strip it, you need to remove the control knob. This wont come off as it has a release lever you can't get to.
Remove the base. Triangle heads. Disconnect the blue and white wires to the heater. Remove the 4 screws way up inside. 
Remove 2 screws under filler, and gently ease out the silicon seal.
Remove the 2 screws adjacent to the coffee holder
Wiggle the top bit, noting you cant remove it as the knob is in place. Remove 2 screws, 1 each side now visible below control knob.
The top piece and boiler are now free. Turn control knob until release lever (white) is visible inside black knob shaft. Press release and pull knob. I took some material off this so it holds ok, but can be removed with a good tug.

The boiler can be separated. Control part comes off revealing ceramic plates.
Took 3 hours with sulfamic acid (Casino descaler) to dissolve the scale. The boiler is aluminium and there was no noticeable change in the surface finish.
29/6/20 descaled. Filled with liquid twice and ran throigh. Left about 30 mins each time. Knob went very stiff, but ok once cooled.
31/7/20 stopped working. 21R safety resistor open circuit. Replaced with 22R 1/2W + 160mA fuse. Circuit part traced. Cap dropper + FWB, 5V + 12V rails. Looks like a pic - sanded top.

Wednesday, 13 December 2017

Bath mixer

Generic mixer bought from Homebase in 2009.
Not massively different to the other mixer on this blog. In the pic below, the hot inlet to the block is on the right (left when mounted)
The cartridge as shown has cold on the RH mesh.
Taken apart as the temperature control seized up due to limescale and little use. There was plenty of grease in the LH threaded part which was moved around to lubricate as needed. Scale removed gently with a screwdriver and finished with emery cloth.
To get the temperature knob in the right place, set knurl to full hot and place grey part such that the 38C limit pin on knob sits just in front of the max temp grey part. When the knob is then rotated it will correctly stop at 38C. Then need to readjust the knurl, so that full cold forces the thermostatic piston to full cold. Partly remove the knob so that it freely turns and turn in the cold direction until you feel the resistance of hitting the piston. Make this point 20C. Then refit knob and turn towards full hot. When it stops, you'll find that by partly removing the knob, that full hot is ~1/8 turn.
If the last part, readjusting the knurl, is not carried out, the piston has nothing to push against, so will only do full hot.
Notes.
In fully cold, the piston is forced ~0.5mm before it hits the stop.
The piston is 5.5mm at ~16C, and extends to 7mm at ~45C
The control knob piston is 22mm at full cold, and extends to 26.5mm at full hot. moves ~2.5mm per 1/2 turn
Thermostatic capsule marked 5701 8H258